#1 in progress: cedar/mahogany medium jumbo scratch build

Take us through building your guitar step by step. Post pictures and tell us what you're doing.
Post Reply
nkwak
Posts: 729
Joined: Sat Nov 13, 2010 9:55 pm
Location: Pittsburgh PA suburbs

Re: #1 in progress: cedar/mahogany medium jumbo scratch buil

Post by nkwak »

Last night I put a little time in on scraping the sides and back purfling. It's looking really good IMHO:

Image

Now I'm concentrating on using a scraper and/or a sanding block to level the sides so that all the side purfling is just as crisp along the entire finished side. I also have some cupping to take care of too:

Image

When I got dusty and tired - I have yet to learn how to properly sharpen my scraper - I moved on to fixing some missing top purfling that had been torn out by a dull mini plane blade. It had been nagging at me:

Image

I admit I've been putting it off but tonight I'm wiping it all down with naptha and tackling the remaining section of binding.
~ Neil
tippie53
Posts: 7147
Joined: Fri Mar 03, 2006 7:09 pm
Location: Hegins, Pa
Contact:

Re: #1 in progress: cedar/mahogany medium jumbo scratch buil

Post by tippie53 »

interesting details. It is a nice documentation
thanks for posting
John Hall
Blues Creek Guitars Inc
Authorized CF Martin Repair Center
president of Association of Stringed Instrument Artisans
http://www.bluescreekguitars.com
hummingbird
Posts: 277
Joined: Thu Nov 11, 2010 11:10 pm
Location: Ottawa, ON

Re: #1 in progress: cedar/mahogany medium jumbo scratch buil

Post by hummingbird »

That's going to be a nice guitar Neil. The roswood bindings look sweet.
Alain
nkwak
Posts: 729
Joined: Sat Nov 13, 2010 9:55 pm
Location: Pittsburgh PA suburbs

Re: #1 in progress: cedar/mahogany medium jumbo scratch buil

Post by nkwak »

Thanks. I'm kind of bummed though because the last piece of rosewood isn't as thick as the side so I'm either going to have to order another one from LMI and specify the thickness (the other 3 came from them and are thicker) or just forge ahead and do a LOT of scraping down of the sides.

Anyhoo, this week I'm working on the fingerboard. I bought two EIR blanks and started working with the less-visually appealing of the two so if I screw it up I won't be as upset. I borrowed my friend's LMI fret slotting jog but he didn't have a template for 25.4" scale so I'm going by the figures on my plans that match both Kinkead and Natelson/Cumpiano's texts.

Image

First I crunched the numbers based on measurements for 25.4" scale from two different texts as well as from the plans I'd purchased. Right before cutting I dialed the precise measurement in my digital caliper here and lined it up prior to doing the actual cut.
Image

Afterward I'd compare it against my Larrivee.
Image

The first few frets went well but kinda went whacky the further on I went. Luckily I hadn't planed the blank down to 1/4" yet and I cut most of the slots shallow. I tried sharpening up my scraper and got a good bit of the sawmarks out when I decided that it was going too slow so I worked on getting my jack plane's blade something resembling scary sharp. I'm in the midst of getting more mass out and am getting close to that 1/4" thickness. The first three fret slots are still prominent but I have another blank in reserve just in case but the issue still remains: I have no template to dial in the precise spacing and close isn't quite good enough.
~ Neil
nkwak
Posts: 729
Joined: Sat Nov 13, 2010 9:55 pm
Location: Pittsburgh PA suburbs

Re: #1 in progress: cedar/mahogany medium jumbo scratch buil

Post by nkwak »

Duplicate post
~ Neil
nkwak
Posts: 729
Joined: Sat Nov 13, 2010 9:55 pm
Location: Pittsburgh PA suburbs

Re: #1 in progress: cedar/mahogany medium jumbo scratch buil

Post by nkwak »

I decided to start over in a way and get that blank down and erase my mistake.

I started with the scraper. I'd always had trouble sharpening in a nice burl but I eventually got it as well as the right angle and way to hold it - you need to bend it slightly and I found that a 45 degree angle worked well for me. I got some nice chocolatey ribbons for my efforts, which is a heck of a lot cleaner than sanding with 150 grit.

Image

Even though I made some progress the going was still very slow...

Image

...so I put the scraper aside and decided to sharpen my 7" jack plane. As with the scraper I finally got a nice edge on the blade and got my technique down.

Image

Mass came off much quicker and more cleanly this way:

Image

Not all of my mistakes were able to be erased though. I'm hoping that these first few frets are close enough though. If not, then I truly start over from scratch with the other - and more visually appealing - rosewood fingerboard blank.

Image

So I asked in another thread here what I was doing wrong and will work at trying to get a better way to measure the distance of each fret from the nut, not from each other. Tonight I'm working on that and will measure several times BEFORE I cut.
~ Neil
nkwak
Posts: 729
Joined: Sat Nov 13, 2010 9:55 pm
Location: Pittsburgh PA suburbs

Re: #1 in progress: cedar/mahogany medium jumbo scratch buil

Post by nkwak »

I'm starting to think that accidents and errors are inevitable and completing this project is an exercise in adapting as opposed to pondering over how to do a step and summoning the courage to proceed. That being said, I put on the last strip of binding the other night (finally) and things came up short.

Image

That was where I actually started though. In my defense, as I'm sure you all know this step involves a lot of tangled materials fighting back and my fingers are stubby so I'm more worried about wicking Titebond between each purf and in the channel and just basically being sloppy. Well, I suppose the green tape didn't hold all that well either, so I'm wondering if I just worked too quickly?

I'm working on a fix though:

Image

I didn't use much glue for this at all. In fact, it's actually sort of wedged in there. I'll have to do something similar with the excess purfling as well. When all's said and done it's probably not going to be pretty but hey this is the back so nobody's even going to look at it that closely.
~ Neil
nkwak
Posts: 729
Joined: Sat Nov 13, 2010 9:55 pm
Location: Pittsburgh PA suburbs

Re: #1 in progress: cedar/mahogany medium jumbo scratch buil

Post by nkwak »

The oddest thing happened last night. I'd always been unhappy with the way the rosette turned out but was resigned to accept it since I'd used CA glue to install it. The problem was specifically that I'd routed out a channel to accept bold BWB prelaminated purfling but in a rush as I flooded the channel with CA glue I'd grabbed fine BWB purfling by accident instead. So I was stuck with gaps and an irregular lay of the purfling. Well, tonight I looked closely at the rosette and as an afterthought I grabbed a thumbtack of all things that had had its tip bent. It resembled a dentist's tool. I'd left a gap in the ring where the fretboard would cover but I noticed that the end of the purfling was jutting out a little. So, out of some neurotic urge I took that little pick and from underneath I pulled at the purfling.

Believe it or not, but it came out easily. In minutes I had nearly the entire ring removed. Sure there was a little tearout in the usual places but nothing that a little AR glue and some sawdust couldn't fill. Still, I decided not to tempt fate any more and will look to replace the purfling with the correct size BWB later today - as well as fill in some gaps in the body purfling.

I don't know if it's luck or serendipty but I'm thankful for this second chance! The guitar will still be far from perfect as this is my first but at least that rosette won't bother me as much anymore!
~ Neil
nkwak
Posts: 729
Joined: Sat Nov 13, 2010 9:55 pm
Location: Pittsburgh PA suburbs

Re: #1 in progress: cedar/mahogany medium jumbo scratch buil

Post by nkwak »

Here's what it looked like after some time leveling out the purfling:

Image

Sawdust is filling in the gaps nicely. How to make them stick though? Shellac followed by CA glue, I wonder?

Image

Image
~ Neil
nkwak
Posts: 729
Joined: Sat Nov 13, 2010 9:55 pm
Location: Pittsburgh PA suburbs

Re: #1 in progress: cedar/mahogany medium jumbo scratch buil

Post by nkwak »

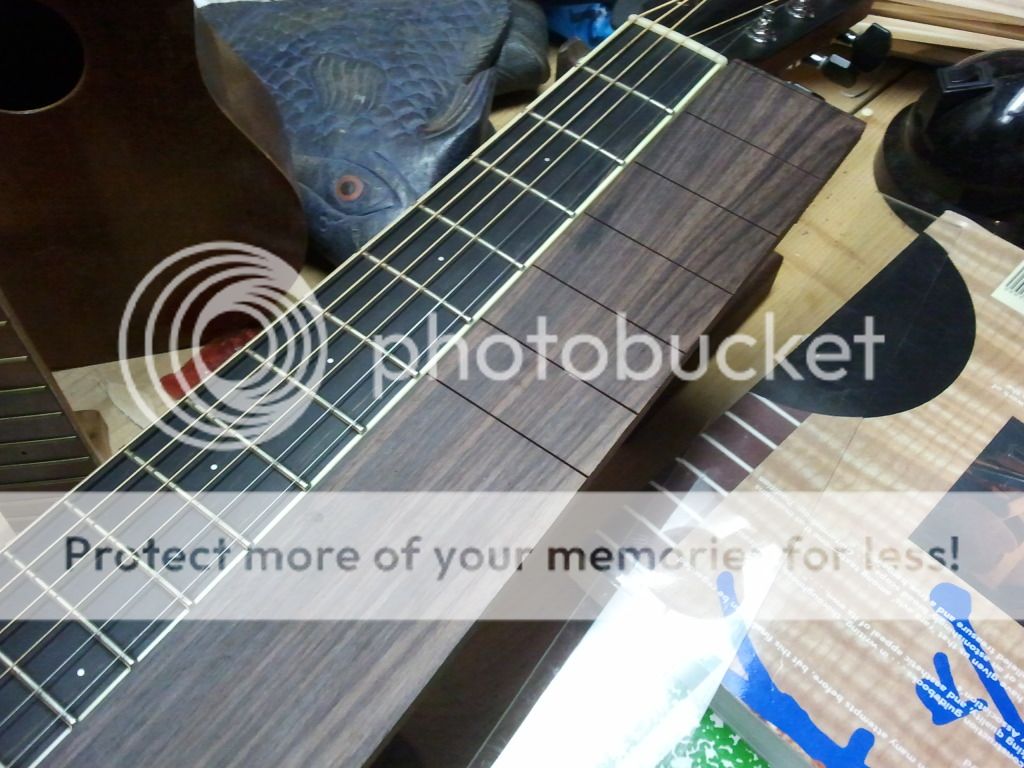
I used System 3 T-99 Epoxy to glue on a serviced EIR fretboard to my 5-piece laminated neck the other day. Last night I took it out of the clamps, trimmed the excess from the soundhole area and bolted it on to the body.

Image

Image

Image

It's getting closer to being done after 2-1/2 years and the list of things to do is dwindling:

- sand away at the thickness/squaredness of the neck
- use a block plane to reduce the thickness from the back of the headstock
- inlay the side markers and fretboard dots.
- fretting
- fashion a bridge out of my remaining EIR blank. For this I need access to a router since my Dremel wasn't up to the challenge.
- drill the tuner post holes into the headstock
- fashion a bolt to affix the fretboard extension to the soundboard
- fix some "oopsies" in the body purfling.
- final sand the entire body
- locate the bridge position and mask it off
- pore fill with either T-88 or pumice/denatured alcohol
- finish (most likely French polish on the body, tung oil on the neck)
- glue down the bridge
- make a nut
- make a saddle
- install tuning machines, a set of chrome Gotoh aftermarket replacement tuners that are currently on my old Takamine
- set it up
- play the sucker, but what song to play first? I'm thinking it's going to be fingerstyle piece whatever it is.
~ Neil
Post Reply