
I believe there is a thread somewhere started a while back on how they made their rosette. This is not entirely new to many of you, but I use a twist that many of you may not be doing. I'll explain later as I go along.
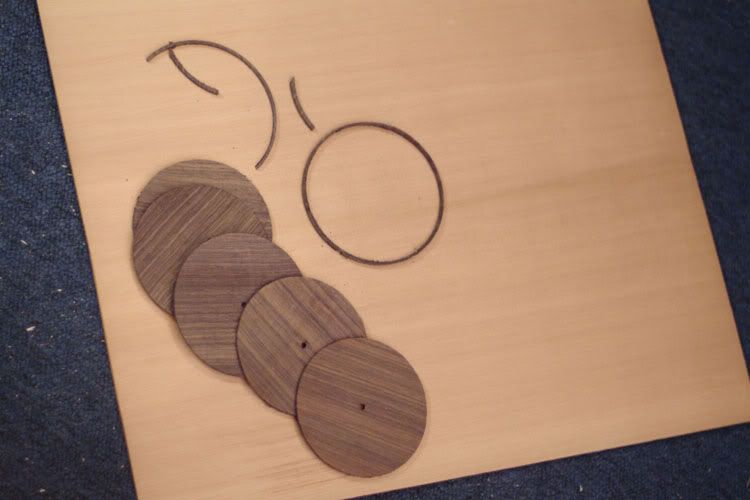
First, I took a block of Cocobolo that I would use for knife handles. It is about 5" long x 1 1/5" wide x 1" thick. I have about 100 of these so I picked out one that had lots of color variation and swirly grain. I cut this into 1/8" slices getting 6. I trued up the edges, and butt joined 4 of them, no in any particular order, and then glued a 5th along one edge of the 4, because 5" was not wide enough for my rosette. I don't show a picture of cutting the block or gluing it up, but you see the structure as I ran it under my drill press safety planer to bring the thickness down to about .080". The I ran it through my thickness sander and brought it down to .070". I then use spray adhesive and glue some paper to a board that is alittle bigger than the rosette blank, and spray glue the blank to the paper. The purpose of the paper is to hold the blank steady while I rout the rosette, and then it makes for separating the the rosette from the back up board easy. I locate the center and drill a 1/8" hole for my circle cutting jig.
I then get my top on the bench and also drill a 1/8" hole in the center of the sound hole. Nothing new so far.
I have my rosette design planned out and drawn on paper. It is a 3/16" ring of cocobolo trimmed on the inside and outside with .060" BWB purfling. This is where what I do makes this a near fool proof installation for fit. I use a bit for dremel that is sized for the purfling I'm installing, in this case a .055" spiral bit. By using this bit, I will be cutting out the wood ring, and at the same time providing for the purflings in the top.
I set the circle jig for the inside cut of the rosette, make about a 1/3rd depth cut, then take the dremel to the top and make the same cut. I continue to rout both the wood ring and the top until I've reached my desired depth. Now I set the jig for the outside of the wood ring, and do the same thing. When done, I should be just cutting through the wood ring down to the paper that it is glued on. I use a putty knife slid under the paper to lift the ring from the back board and there I have my rosette ring. Now I rout out between the two cuts on the top for all the parts. What I have done is duplicated in the top the width of the ring plus the width of the inside and outside purflings. When I insert them in the routed out area, the fit is perfect! What makes this work is the purfling is not really .060" although they say it is made with .020" each of the black, white, black fiber. It mics out at about .058" so I end up with just enough room for the glue. I bevel the bottom edge of the purfling so it is guided in nicely around the wood ring. It if is a little bit tight, I just use a small bit of sandpaper and run it around the outside and inside of the routed out area. I use white LMI glue to glue it all in.
This might be one of those "DUH" things, but I didn't even realize I could do this on my first two rosettes. You can purchase the correct size bits for your dremel or router to match the size purfling you are using. Easy, and easy to get a nice tight clean fit of your rosette.
This works good for me because I like to make my own rosettes and I like making them out of wood.
I hope this helps someone out there who hasn't yet done their own rosette but wants too.
Kevin
How I make and install a wood rosette.
-
Kevin Sjostrand
- Posts: 4127
- Joined: Sat Feb 09, 2008 8:06 pm
- Location: Visalia, CA
How I make and install a wood rosette.
You do not have the required permissions to view the files attached to this post.
-
Kevin Sjostrand
- Posts: 4127
- Joined: Sat Feb 09, 2008 8:06 pm
- Location: Visalia, CA
Re: How I make and install a wood rosette.
more pics......
You do not have the required permissions to view the files attached to this post.
-
Kevin Sjostrand
- Posts: 4127
- Joined: Sat Feb 09, 2008 8:06 pm
- Location: Visalia, CA
Re: How I make and install a wood rosette.
and more pics....
You do not have the required permissions to view the files attached to this post.
-
Kevin Sjostrand
- Posts: 4127
- Joined: Sat Feb 09, 2008 8:06 pm
- Location: Visalia, CA
Re: How I make and install a wood rosette.
and the final pics....
Kevin
Kevin
You do not have the required permissions to view the files attached to this post.
-
Winston_S
- Posts: 67
- Joined: Sat Sep 03, 2011 5:39 pm
Re: How I make and install a wood rosette.
Thanks Kevin,
Am just doing some planning on my second build and just today was giving some thought as to how to do this very thing. Good timing. :-)
Am just doing some planning on my second build and just today was giving some thought as to how to do this very thing. Good timing. :-)
Winston (Kip) Scoville
-
Darryl Young
- Posts: 1685
- Joined: Fri Jul 30, 2010 6:44 pm
- Location: Arkansas
Re: How I make and install a wood rosette.
Kevin, I enjoyed that post. Nice, simple method and those kind are always the best!
A question, does the Cocobolo oil stain the spruce top? Did you use shellac to prevent this? I'll be using Cocobolo binding later is why I ask.
A question, does the Cocobolo oil stain the spruce top? Did you use shellac to prevent this? I'll be using Cocobolo binding later is why I ask.
Slacker......
-
Kevin Sjostrand
- Posts: 4127
- Joined: Sat Feb 09, 2008 8:06 pm
- Location: Visalia, CA
Re: How I make and install a wood rosette.
Darryl,
No issues with the cocobolo. You don't want to wipe it with solvent once inlaid across to the spruce, this might drag color onto the top. The dust from sanding isn't a problem, just blow it off dry, and then sand the spruce a little with fresh sandpaper. I do set the wood ring a skosh lower than the top and sand down to it, that way I'm making very little cocobolo sanding dust. I do this with my orbital sander before the sound hole is cut out. Right now the grit on my drum sander is too coarse for this.
I hope this helps someone else make their rosette.
I find this a sure fire way to get it to fit correctly.
Kevin
-
Tim R
- Posts: 104
- Joined: Fri Jul 08, 2011 4:15 am
Re: How I make and install a wood rosette.
Kevin,
What kind of router circle cutting jig do you use?
Tim
What kind of router circle cutting jig do you use?
Tim
-
deadedith
Re: How I make and install a wood rosette.
Kevin, can you help me out by explaining the difference between your method and the 'conventional' way of doing it?
Thanks
Thanks
-
nkwak
- Posts: 741
- Joined: Sat Nov 13, 2010 9:55 pm
- Location: Pittsburgh PA suburbs
Re: How I make and install a wood rosette.
Thanks for the pictorial, Kevin. I notice that you have a sketch on notebook paper. Did that serve as a template to measure the distances from the center?
I tried my best to do something similar with EIR but I kept chipping it with the Dremel. After making a complete set of coasters I finally decided to make a fatter ring and do several passes with the bit set to progressively deeper cuts:
I started with this which unfortunately I did not use as a template. I was trying to figure out exact numbers and drafting them out in Adobe Illustrator but when it came time to do actual cutting I ended up getting frustrated when I couldn't get the Stewmac circle cutting jig to cooperate. :

..and ended up with this:

It was obviously the result of compromise and clearly shows my inexperience (not the purfling ring) but I hope the next one is better.
I tried my best to do something similar with EIR but I kept chipping it with the Dremel. After making a complete set of coasters I finally decided to make a fatter ring and do several passes with the bit set to progressively deeper cuts:
I started with this which unfortunately I did not use as a template. I was trying to figure out exact numbers and drafting them out in Adobe Illustrator but when it came time to do actual cutting I ended up getting frustrated when I couldn't get the Stewmac circle cutting jig to cooperate. :
..and ended up with this:
It was obviously the result of compromise and clearly shows my inexperience (not the purfling ring) but I hope the next one is better.
~ Neil