
Ahaaa... I could try something like that yes, drill holes in the caul and put something throught that. By the way, I only dared to do this because this guitar had numerous dents and scratches already, but I wouldn't want to perform this repair on an immaculate guitar; how do you get the bridge off without any damage to the surrounding finish at all??Ben-Had wrote:A setup like this will work.
Bridge removal
-
LaurentB
- Posts: 9
- Joined: Sun May 25, 2014 6:39 am
- Location: Eindhoven, Netherlands
- Contact:
Re: Bridge removal
-
Ben-Had
- Posts: 1405
- Joined: Fri Sep 03, 2010 2:14 pm
- Location: Creedmoor, NC
Re: Bridge removal
I have a bridge heating blanket, others carefully use an iron to heat the bridge, then work a pallet knife carefully under the bridge all the way around the edges to separate it from the top. The glue starts to release at around 145*.
edit: I use 3/16" sized bolts and put soap on the threads so any glue that may squeeze through will not stick to the bolts.
edit: I use 3/16" sized bolts and put soap on the threads so any glue that may squeeze through will not stick to the bolts.
Tim Benware
-
LaurentB
- Posts: 9
- Joined: Sun May 25, 2014 6:39 am
- Location: Eindhoven, Netherlands
- Contact:
Re: Bridge removal
Good tip about the soap, thanks!. Getting the bridge off I have managed by heating the pallet knife. It takes time, but it works. The main problem however being how to not damage the finish around the bridge at all with the knife. I put masking tape all around it now.Ben-Had wrote:I have a bridge heating blanket, others carefully use an iron to heat the bridge, then work a pallet knife carefully under the bridge all the way around the edges to separate it from the top. The glue starts to release at around 145*.
edit: I use 3/16" sized bolts and put soap on the threads so any glue that may squeeze through will not stick to the bolts.
-
LaurentB
- Posts: 9
- Joined: Sun May 25, 2014 6:39 am
- Location: Eindhoven, Netherlands
- Contact:
Re: Bridge removal
I cannot BELIEVE how much easier clamping and glueing the bridge is with the bolts-through-the-caul system! Not only don't I have to worry about the bridge creeping forward anymore, but also the positioning of the bridge and putting the caul on top is a breeze like this!
So tomorrow I'll be able to string up my 1971 Yamaha FG-230 again!
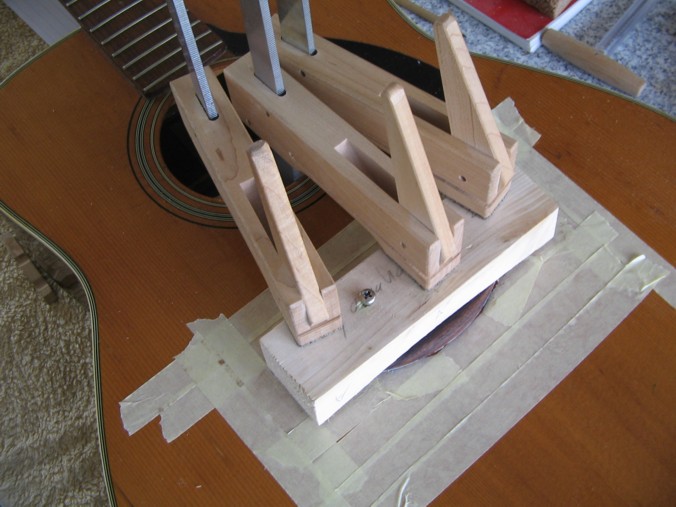
So tomorrow I'll be able to string up my 1971 Yamaha FG-230 again!
-
ruby@magpage.com
- Posts: 1564
- Joined: Thu May 24, 2012 8:03 am
- Location: Chestertown Maryland
Re: Bridge removal
The important part of Tim's gluing jig for you are the 2 bolts that go through the bridge and the top to keep the bridge from sliding out of place. His clamp is really the best way I have found to glue a bridge and if you build it with slots where the 2 bolts are, you can use it for a variety of string spacings at the bridge.
However, if you don't want to build the jig, try these plastic non-stick pins for keeping the bridge from moving - you could even make something like this easily
http://www.stewmac.com/Luthier_Tools/Ty ... _of_6.html
Ed
However, if you don't want to build the jig, try these plastic non-stick pins for keeping the bridge from moving - you could even make something like this easily
http://www.stewmac.com/Luthier_Tools/Ty ... _of_6.html
Ed
Ed M
-
Ben-Had
- Posts: 1405
- Joined: Fri Sep 03, 2010 2:14 pm
- Location: Creedmoor, NC
Re: Bridge removal
You're right Ed about the slots and mine actually is now, that was an old pic and I have the pins you linked as well, don't use them much but handy to have around when you need some.ruby@magpage.com wrote:The important part of Tim's gluing jig for you are the 2 bolts that go through the bridge and the top to keep the bridge from sliding out of place. His clamp is really the best way I have found to glue a bridge and if you build it with slots where the 2 bolts are, you can use it for a variety of string spacings at the bridge.
However, if you don't want to build the jig, try these plastic non-stick pins for keeping the bridge from moving - you could even make something like this easily
http://www.stewmac.com/Luthier_Tools/Ty ... _of_6.html
Ed
Tim Benware
-
LaurentB
- Posts: 9
- Joined: Sun May 25, 2014 6:39 am
- Location: Eindhoven, Netherlands
- Contact:
Re: Bridge removal
As you can see I did build kind of a jig like Tim's and it indeed worked very nicely!
Here it is, finished and with a new set of bridge pins, because that was a hodge podge of three different colours:

Here it is, finished and with a new set of bridge pins, because that was a hodge podge of three different colours:
-
Ben-Had
- Posts: 1405
- Joined: Fri Sep 03, 2010 2:14 pm
- Location: Creedmoor, NC
-
nehsgolfer
- Posts: 89
- Joined: Tue Mar 11, 2008 9:09 am
Re: Bridge removal
I, too, have just acquired a 40 or so year old Yamaha FG-230 12-string and I have many questions about restoring/updating it. First of all, the bridge needs replacing because the neck needs resetting and the saddle has been shaved down as far as it will go (past the wood, actually) and I would like to replace it with a smaller bridge. This will involve some refinishing work, I assume. Also ,the neck is the thickest (not widest) neck I have ever seen. I was wondering if I could sand the neck down to a comfortable thickness and refinish it without any structural problems. I'm also thinking about installing a Bridge Doctor to help with the bulge below the bridge. Other than that, it's in pretty good shape. The best part, it was free!