Page 1 of 2
Now it gets hard: first neck carve/set
Posted: Mon Jun 04, 2012 7:58 pm
by nkwak
What was I thinking? My first build: from scratch, making my own molds, then going on to making a 5 piece laminated neck with bolt on M/T joint. Making the blank was easy but this week it's time to carve the heel and set the neck. I've already thought of at least a half dozen things I'll do differently next time!


The carving will be fund. Loosening/retightening bolts 300 times between sanding and checking the angle? Not so much.
Re: Now it gets hard: first neck carve/set
Posted: Wed Jun 06, 2012 11:35 pm
by Ken Hundley
I learned the hard way to put my inserts in before I cut the tenon. That way, I have plenty of wood around them to absorb the stress of the inserts. When you put yours in, make sure you tightly clamp some backup blocks on either side of the tenon, or you will crack, Otherwise, this is (to me) one of the most rewarding and difficult ( to get perfect) parts of guitar building. Carving is easy. Getting it right for the finished product is a whole different animal. Have fun, good luck, and let us know how it goes.
Re: Now it gets hard: first neck carve/set
Posted: Wed Jun 06, 2012 11:37 pm
by Ken Hundley
I learned the hard way to put my inserts in before I cut the tenon. That way, I have plenty of wood around them to absorb the stress of the inserts. When you put yours in, make sure you tightly clamp some backup blocks on either side of the tenon, or you will crack, Otherwise, this is (to me) one of the most rewarding and difficult ( to get perfect) parts of guitar building. Carving is easy. Getting it right for the finished product is a whole different animal. Have fun, good luck, and let us know how it goes.
Re: Now it gets hard: first neck carve/set
Posted: Thu Jun 07, 2012 6:45 am
by nkwak
Thanks! I'm not sure I follow though. I drilled the holes for the inserts before I cut the tenon and have tightened the bolts down several times. Now I intend to carve out into the cheeks on either side of the tenon so that I have less to sand away when fitting the neck.
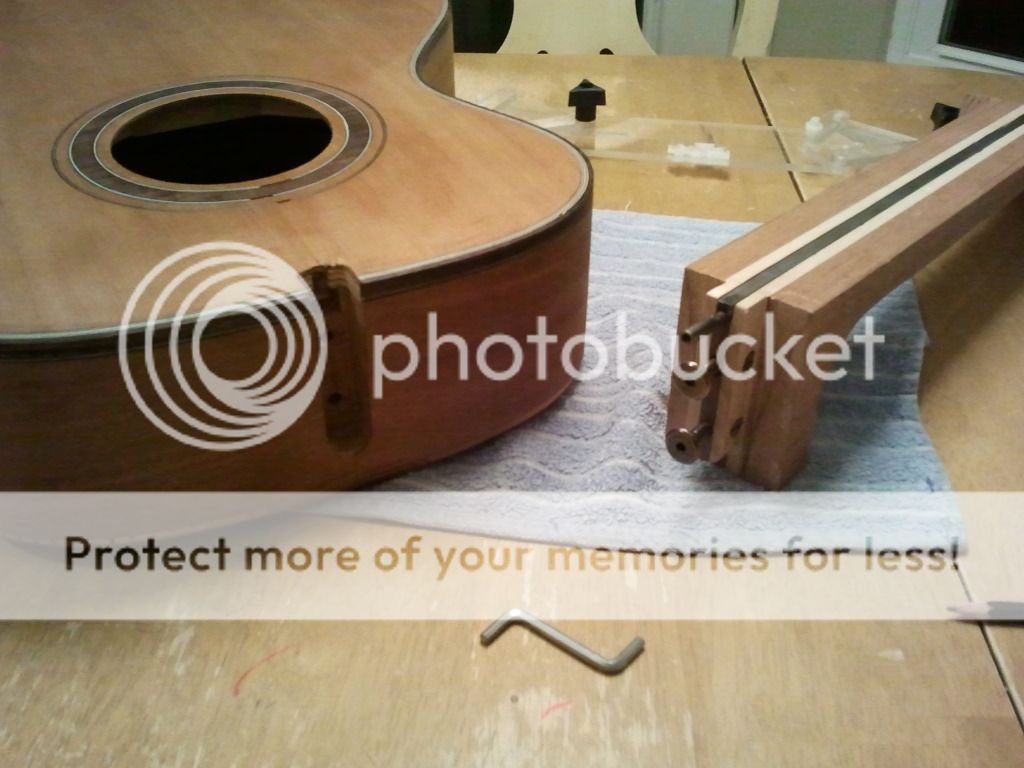
Edit: here's a picture of the heel after being freshly cut by an extremely dull bandsaw blade. The inserts had already been drilled and I even took them out and ground their ends flush so that they would fit inside the mortise.

Re: Now it gets hard: first neck carve/set
Posted: Thu Jun 07, 2012 4:07 pm
by DJ.Dixon
I really like the guitar so far. Is that cedar?
Re: Now it gets hard: first neck carve/set
Posted: Thu Jun 07, 2012 4:09 pm
by DJ.Dixon
duplicate post
Re: Now it gets hard: first neck carve/set
Posted: Fri Jun 08, 2012 2:40 am
by ColestineGuitar
Your pictures are pretty good! I have carved one neck so far, and it turned out fine, but your process is well thought out. I look forward to any more posts you come up with.
Re: Now it gets hard: first neck carve/set
Posted: Sun Jun 10, 2012 5:48 am
by Herman
The right way tp go, Neil. Jump into the deep, 'cause that's the manner to learn the most quick. I remember my first time. Wow, what a sweat. Now I'm on number 10, and I can assure you it gets easier after a few. And as Ken mentioned, It is one of the most rewarding work (next to the finish) of the build.
Keep going!
Herman
Re: Now it gets hard: first neck carve/set
Posted: Wed Jun 20, 2012 10:46 am
by nkwak
I think I've got the heel close enough to where I can move on to sanding for the neck angle. The shape is coming along nicely. First, I carved/sanded the sides to follow the contour then I sanded again in a 45 degree angle with a file. Then I sort of smoothed things out. The irregularity of the cut of my lamination outlines has made things difficult - but I think if there's a next time I'll laminate first, then cut - but I'm hoping that that works itself out once I start doing the neck profile at the 10th and 1st frets using my template.

I also went and chiseled into the end of the neck so that the sanding area is greatly reduced:

Once I figure out how to get around the 14th fret hump on the body I'll start sanding in earnest. For now I'm switching my focus toward the headstock. The shape is nothing original but one I find pleasing to the eye:

The trick for me though is actually cutting out the outline given that I'm going to try a volute - yeah I know I've shot myself in the foot many times! I thought it through and given that my top surface is flat then that's the surface that should be against the bandsaw table. That means that I have to have a visual reference on the back. How to line it up though? Well, I started by drawing a line across two symmetrical points on the design:

...then using a T-square make a perpendicular line on the side of the headstock blank and flipping the neck over:

From there I drew another line across the back of the headstock and laid my paper template in what I hope is the correct relative position:

This doesn't take into account the headstock face plate veneer - or the potential use of a veneer on the back plate - but it at least frees me up to thinking about what I need to do with regards to gluing the top face veneer on. It may be in my interest to make a plexiglass template of the headstock.
Sorry so boring - and probably obvious to some of you - but as they say, measure twice (at least) and cut once!
Re: Now it gets hard: first neck carve/set
Posted: Wed Jun 20, 2012 10:49 am
by nkwak
DJ.Dixon wrote:I really like the guitar so far. Is that cedar?
No, it's some species of mahogany that I bought at the local Rockler Hardware. I'm not sure if it's African or south American though. It has a pink shade to it when freshly cut but once it oxidizes it matches the back and sides. The center laminates are maple and walnut.