Back braces on #1

What're You Doing?
nkwak
Posts: 660
Joined: Sat Nov 13, 2010 9:55 pm
Location: Pittsburgh PA suburbs

Back braces on #1

Post by nkwak »

I just got the back braces glued in on my mahogany/cedar medium jumbo last night:

Image

Image

Image

Image

I had some trouble getting a good glue joint on a couple of the braces so I had to redo one. Next time I'll get to see if all is OK to proceed to shaping.
~ Neil
kencierp

Re: Back braces on #1

Post by kencierp »

I know that we see guys/gals sanding braces using a contoured dish but that is not how the geometry works -- the braces should be sanded "flat on the bottom" to the desired radius. Rubbing them in a dish tends to round the edges width-wise and poor glue surfaces are the result. The length-wise radius of the back plate is formed by the rim and is a non-issue relative to the small surface width of the braces.
johnnparchem
Posts: 2354
Joined: Sat Apr 10, 2010 10:50 pm
Location: Seattle
Contact:

Re: Back braces on #1

Post by johnnparchem »

kencierp wrote:I know that we see guys/gals sanding braces using a contoured dish but that is not how the geometry works -- the braces should be sanded "flat on the bottom" to the desired radius. Rubbing them in a dish tends to round the edges width-wise and poor glue surfaces are the result. The length-wise radius of the back plate is formed by the rim and is a non-issue relative to the small surface width of the braces.
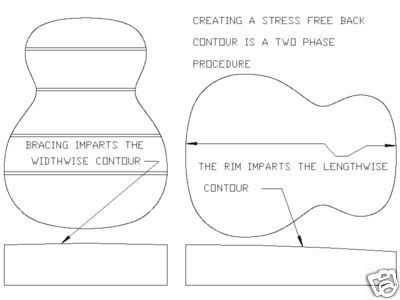
What if the rim is shaped with a dish as well so the back is shaped to the dish? I glue the braces in the dish as well. I am ready to learn. I have changed the way I prepare the top based on your other posts.
Kevin Sjostrand
Posts: 3727
Joined: Sat Feb 09, 2008 8:06 pm
Location: Visalia, CA

Re: Back braces on #1

Post by Kevin Sjostrand »

Neil,
Those braces look pretty good, I like the shape. Show us after you carve them.
I understand the issue with the compound radius, but at about 5/16" width, the brace probably doesn't pick up much of it. I have trouble enough keeping mine flat. I've tried sanding them on a flat radius stick, carving the radius with a hand plane, using a robo sander and following a pattern. They all have their drawbacks. Next I'm using a pattern and a pattern bit in my router table.

Kevin
kencierp

Re: Back braces on #1

Post by kencierp »

John,
I've attached a few photos/illustrations that I think convey the issue/problem. I believe the main concern is distorting the gluing surface of the brace --- I don't think there is much chance of getting a perfect match to the final back contour simply sanding the braces against the dish -- further, bending the back plate on such a tiny cord (brace width) in highly improbable. As the illustration shows its the back braces that impat the width-wise curve and the rim imparts the length-wise curve. Using a contour dish as a caul while not optimum creates enough compression as to not be real issue. The one picture is of Jim Olson's back brace clamping caul -- its the production version of the 3x5 card method. The little sanding fixture is what I used to squared the brace glue surfaces prior to our CNC machining operations -- hope this makes a little sense.

Image
Image
Image
Image
johnnparchem
Posts: 2354
Joined: Sat Apr 10, 2010 10:50 pm
Location: Seattle
Contact:

Re: Back braces on #1

Post by johnnparchem »

Thanks Ken,
The ilustrations actually embarrass me a bit in that I did not see the reason when I had a problem in my own work. On my last classical I removed a back brace that seemed inexplicitly tilted. Now I know why! I agree having the gluing face perpendicular to the sides is important. I also understand what you mean about the rims providing the top to bottom arch.
nkwak
Posts: 660
Joined: Sat Nov 13, 2010 9:55 pm
Location: Pittsburgh PA suburbs

Re: Back braces on #1

Post by nkwak »

kencierp wrote:I know that we see guys/gals sanding braces using a contoured dish but that is not how the geometry works -- the braces should be sanded "flat on the bottom" to the desired radius. Rubbing them in a dish tends to round the edges width-wise and poor glue surfaces are the result. The length-wise radius of the back plate is formed by the rim and is a non-issue relative to the small surface width of the braces.
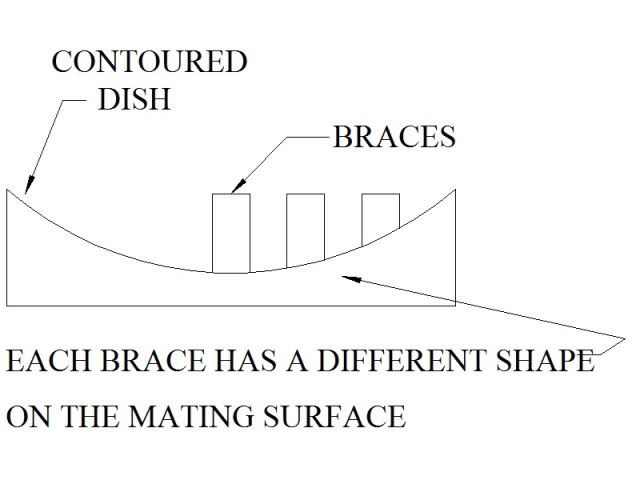
I understand what you're saying, Ken. I used one of those little cauls to keep the brace from rocking while I sanded. I marked the underside with a pencil then started out side to side along the length of each brace to get the bulk of the arc, quitting once the pencil marks were all gone. The I sanded back and forth across the width of the brace. The profiles of the gluing surface of my braces did look a lot like this illustration you provided; not only is there an arc along the length of the brace but across the width as well:

Image

To be fair, the lateral arc probably isn't perfect (and I have an idea of how I'd do things differently next time to get closer to that elusive perfection) but it's gotta be close. That's one issue that could affect the glue joint.

The other issue I was having with glue joint was that one end of the lowermost brace on the lower bout wanted to come up. If I had to guess, I'd say that I eased off the pressure and didn't allow the glue (Titebond I) to get that initial tack and I didn't install the go bar on that end properly. So I took it off before the tack had a chance to really take, cleaned up the glue and did it over, this time holding the brace down for a few extra seconds in order for the glue to tack. Then I put in 5 go-bars. It looked like it held.

I'll have to take a close look at it the next time I'm over at my friend's shop where I've been doing the vast majority of the work on this build.
~ Neil
David L
Posts: 1319
Joined: Thu Jan 06, 2011 8:04 pm
Location: Slidell, La

Re: Back braces on #1

Post by David L »

Correct me if I'm wrong Ken, utilizing the KMG Universal Brace Contouring System eliminates this problem. I have this system and have had flat surfaces on the bottom of my braces for glue-ups.

David L
kencierp

Re: Back braces on #1

Post by kencierp »

Hi David,
Yes the KMG Bracing Making Fixture is the powered version of the above sanding device. You are good to go.
kencierp

Re: Back braces on #1

Post by kencierp »

Hi Neil,

I assume you have seen this:

http://www.kennethmichaelguitars.com/contourtool.html

I can assure with a very high level of confidence that sanding the braces flat on the bottom and using the a clamping device like Jim Olson or even the 3x5 card clamping cauls will yield more constant and less frustrating results then your current process. While the back plate is flexible it is not elastic -- forming the plate in one direction (braces) then the other (rim) helps deal with the stiffness of the wood.
Post Reply