
Number 13 - EIR\Sitka Drednought -Finished
-
Kevin Sjostrand
- Posts: 3721
- Joined: Sat Feb 09, 2008 8:06 pm
- Location: Visalia, CA
Re: Number 13 - EIR\Sitka Drednought
Dooling drednaughts. You caught up to me.
-
johnnparchem
- Posts: 2354
- Joined: Sat Apr 10, 2010 10:50 pm
- Location: Seattle
- Contact:
Re: Number 13 - EIR\Sitka Drednought
Whoops this is a fairly long post as I have not been keeping up with the blog. Since the last post I have completed the bracing of both the top and the back and have fitted the braces to the rim. For those that want to follow I will lay out the pictures of the procedures I followed.
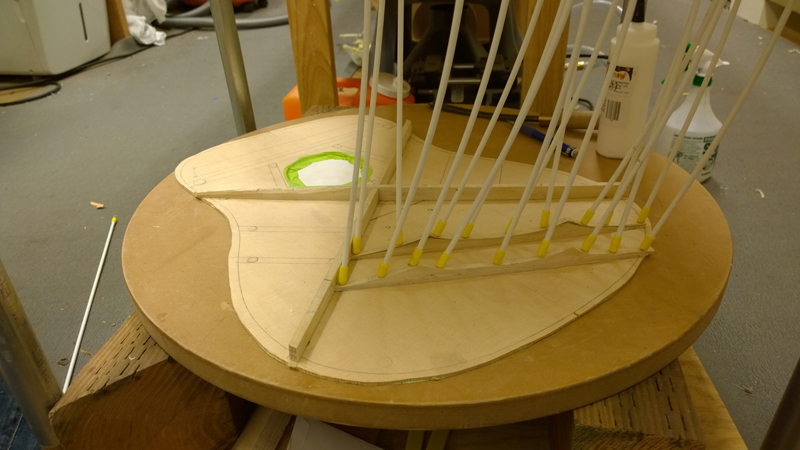
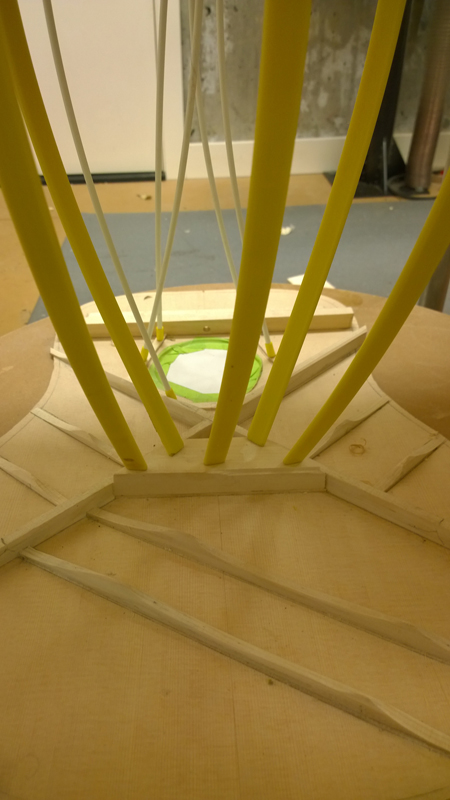
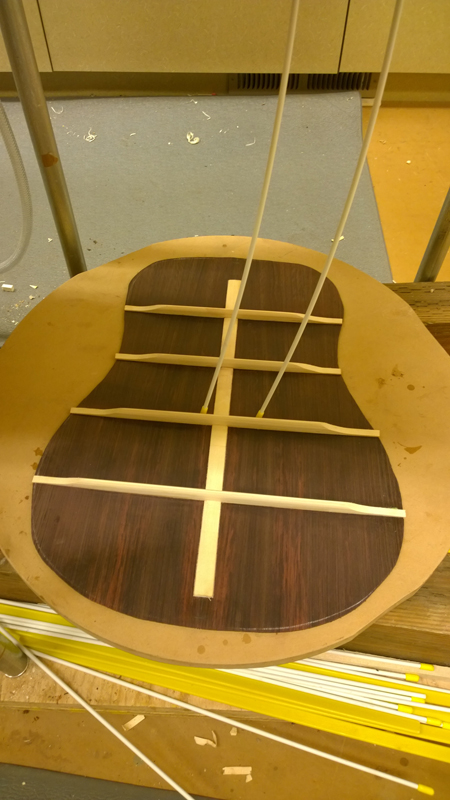
Those viewing my previous posts might have noticed I put in the x-braces before I put in the bridge plate. I normally do it in the reverse order and glue the bridge plate down on a flat surface. No big deal but when I did glue down the bridge plate I used my massive fiberglass slats to force the un radiused gluing caul down in the radius dish. Normally I used the much safer and friendlier fiberglass rods. Also in the pictures I sort of went back and forth between glued rough shaped braces and just radiused braces.
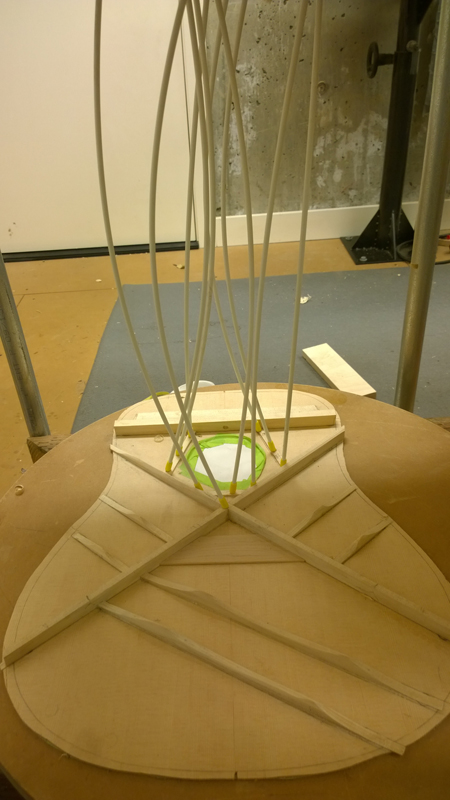
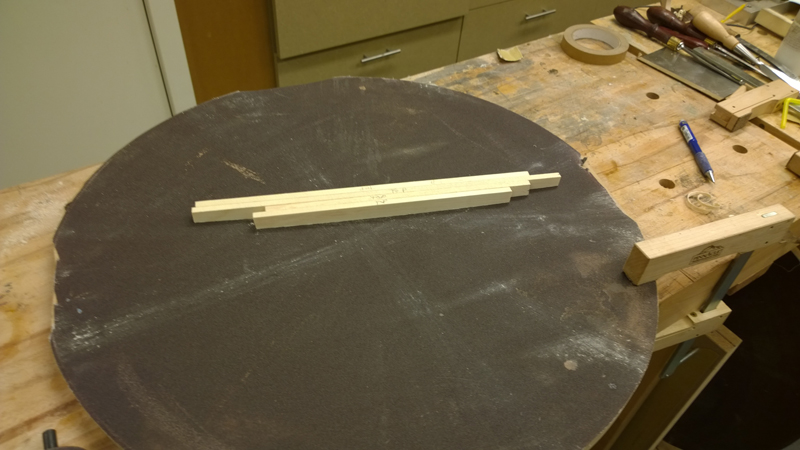
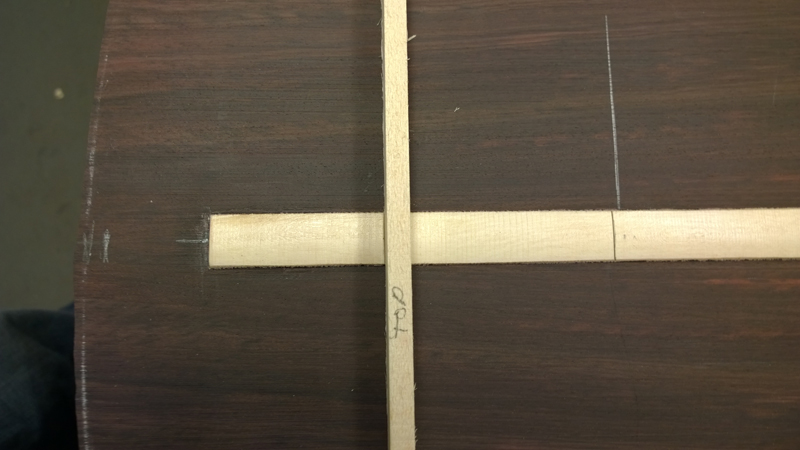
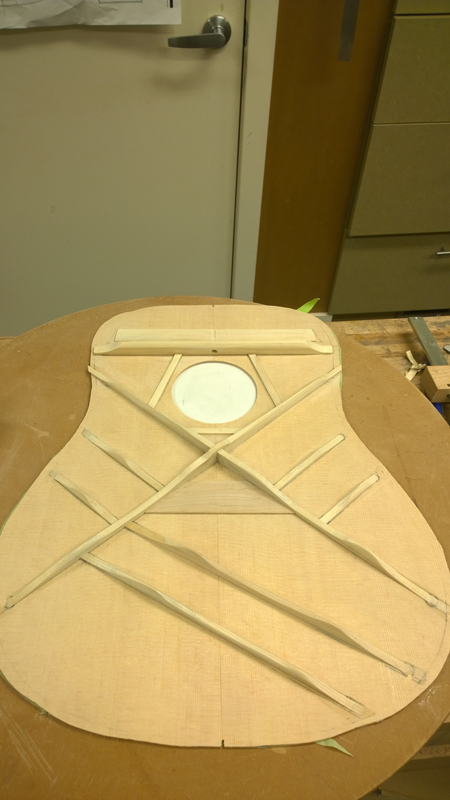
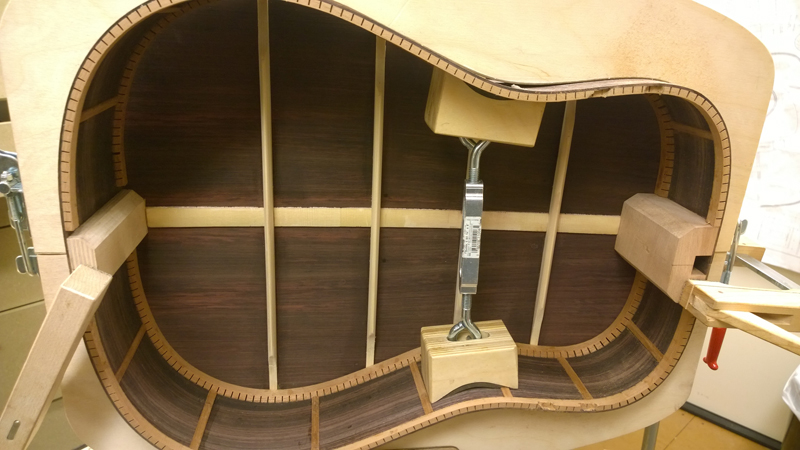
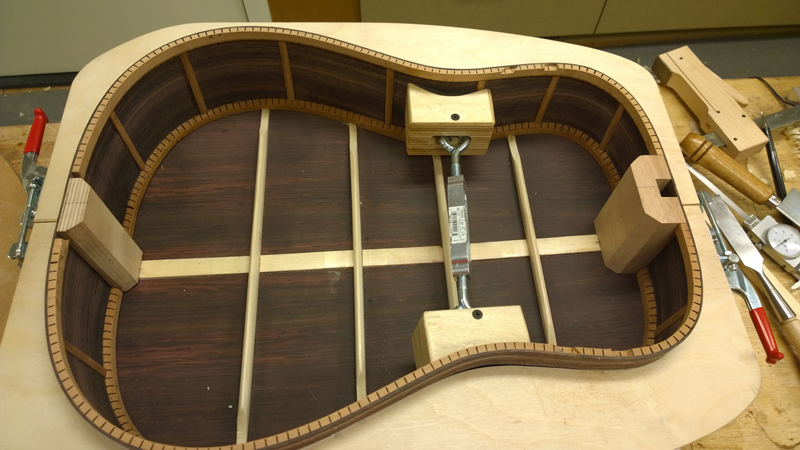
Sort of mixed into working on the top I also worked on the back bracing. Based on advise for the wood I am using and the purpose and size of the guitar I am building a non-live back guitar and have used four full height braces shaped with a plane to a near triangular shape. Trying to up my game on this back I took much care to get everything square and to have clean and square cuts into the back strip for the braces.
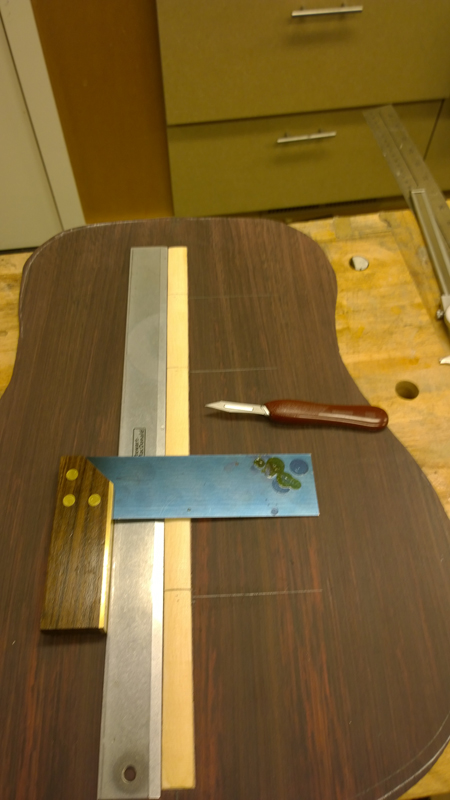
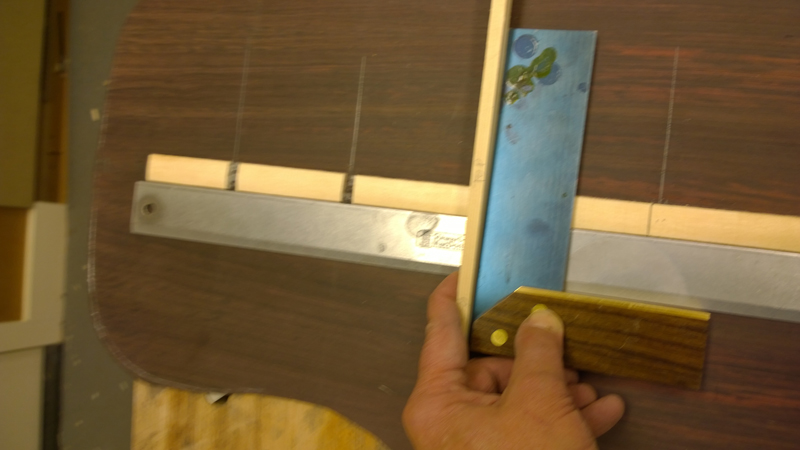
I first put 15' radius on all of the back braces. I use a combination of a plane to rough shape the radius and the sanding dish to finish it off. In the past I used the back strip as my guide for back braces. This guitar I made sure I had a straight edge to work with as you can see in the pictures. I used the straight edge and the square for all of the cuts I made with a scalpel and a new blade. The scalpel is so sharp there is no need for a saw as it cleanly and accurately cuts the slots. It worked out well as the braces pushed into the slots ended up square.
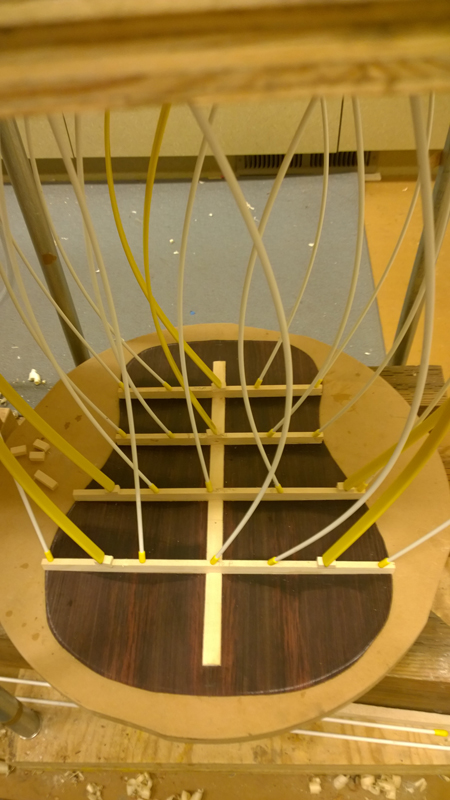
I went after the top and back braces with my chisels and block planes until I got the shape I wanted. Again trying to clean up my normal style I took more care to protect the plates while working on the braces. In the past I always ended up with some scratches deep scratches from the chisels. I ended relatively (to my past efforts) clean. Once I had the top braces to plan. I did tap tune them a bit mostly taking wood off of the finger and diagonal braces to the top felt alive. After the guitar is finished with the bridge on I may do some tuning from the sound hole based on the tops performance. I am happy where it is now it has some nice tap tones.
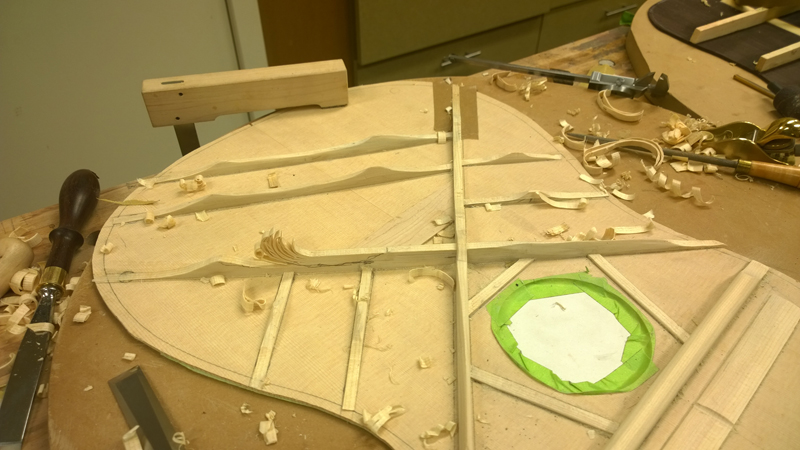
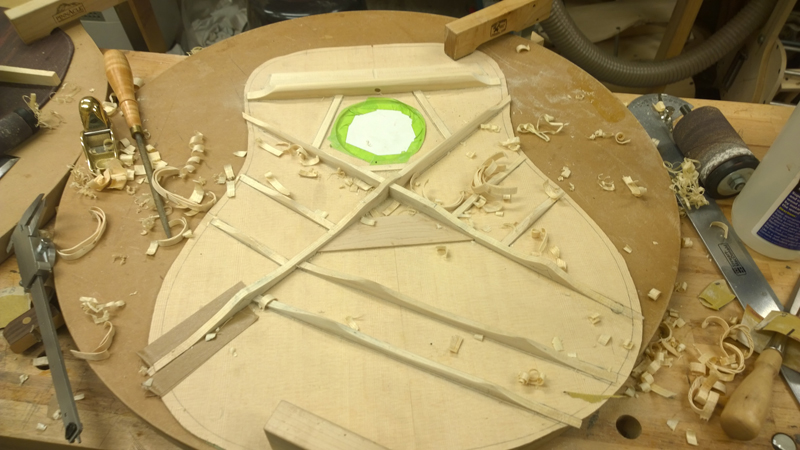
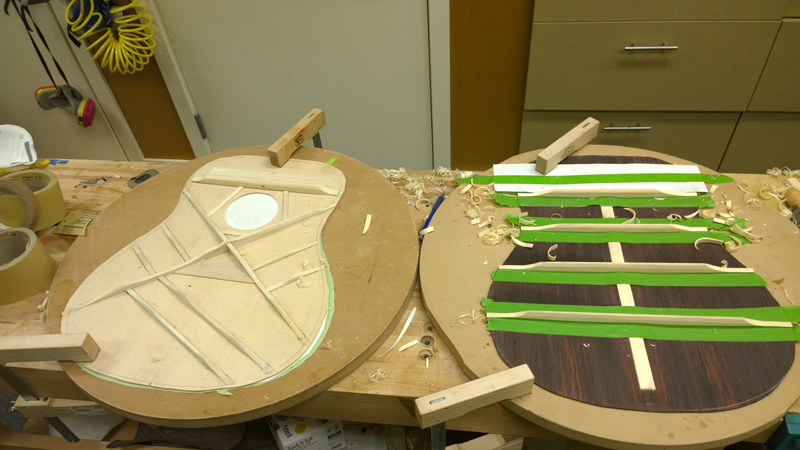
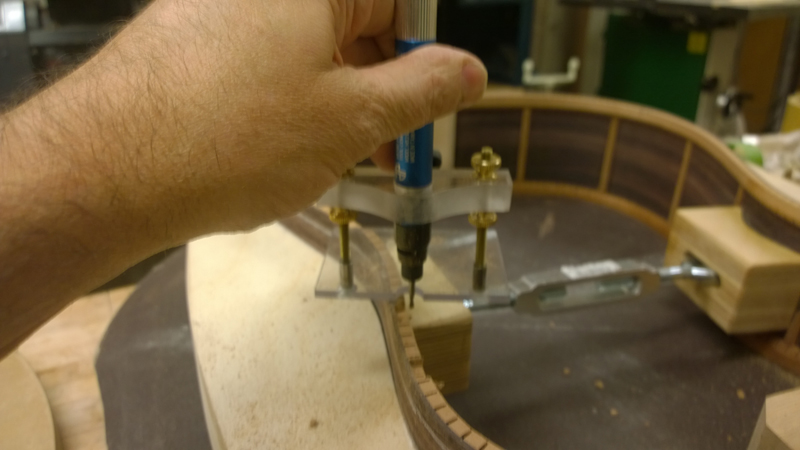
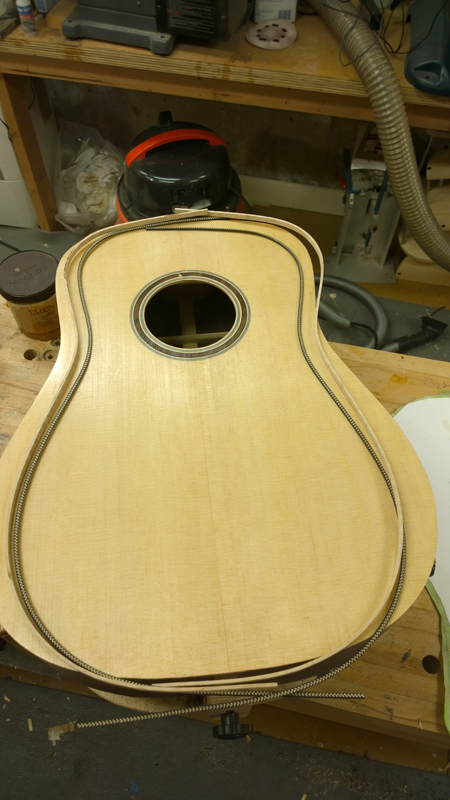
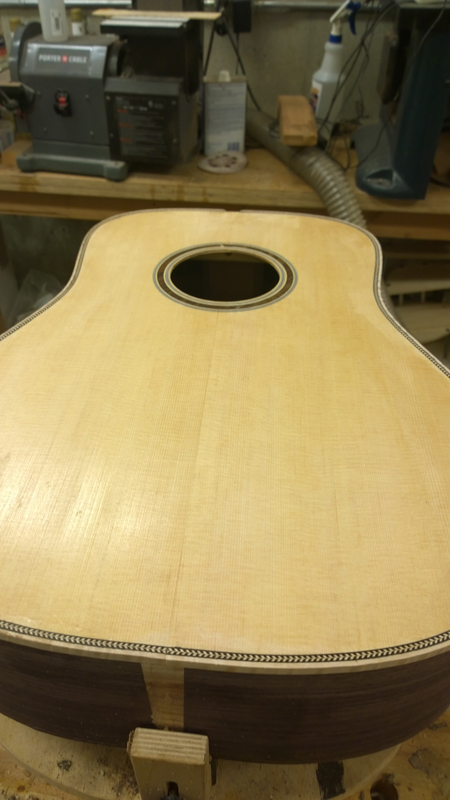
I fit the top and back to the rims. Here as well I have been trying to assure a tight fit from the beginning making sure to clearly center and carefully mark where the braces intersect the rims. Part of carfully marking the braces is I make sure that I can see and that I have access to mark them. While all of the tails of the braces are close in height I still individually set the my die grinder for each brace before I route the rebate into the kerfed linings on the rims. All in all the procedure went well for the top and the back.
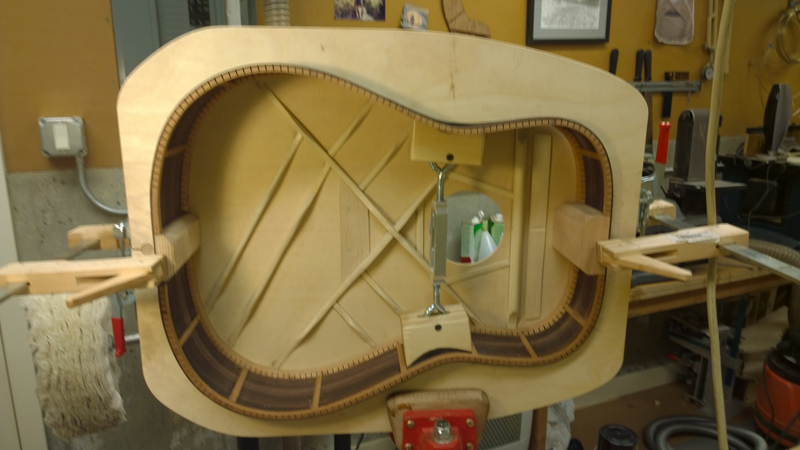

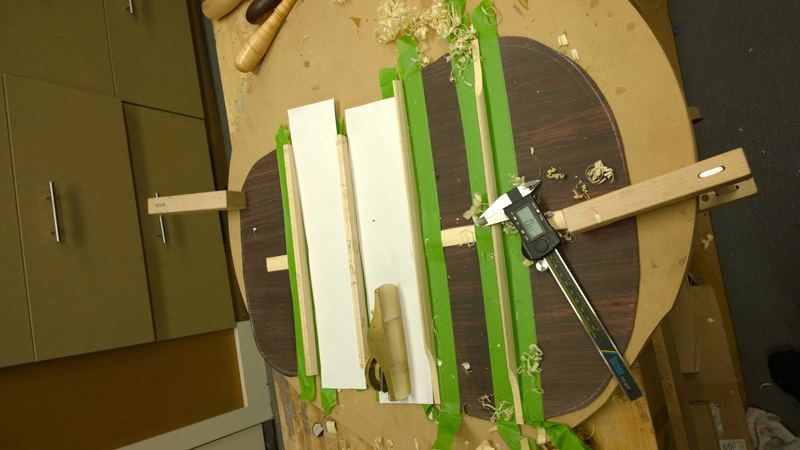
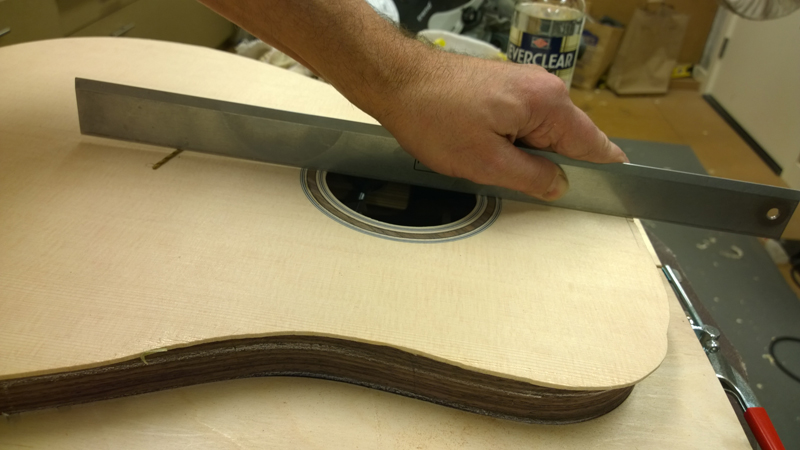
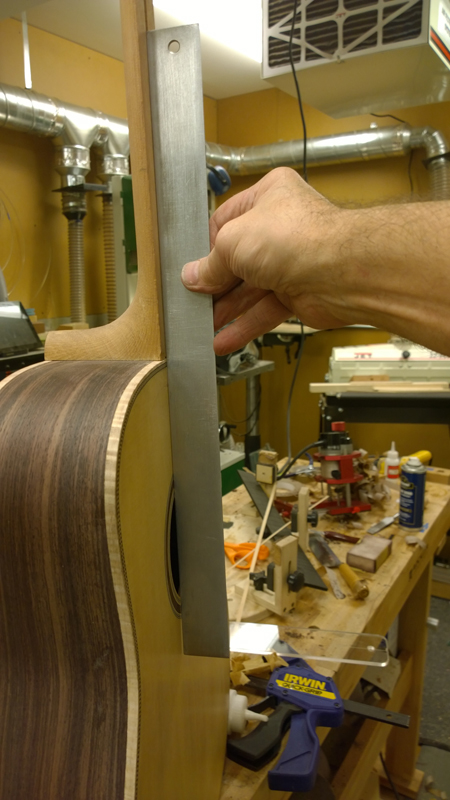
With the top properly fitted, I rechecked that the angle on the top was right where I want it. The idea is a fret board extension flush to the top will be at the correct angle to give me the planned string height off the top at the saddle location. A 2.5 mm drill bit rolled up tight right at the saddle location.
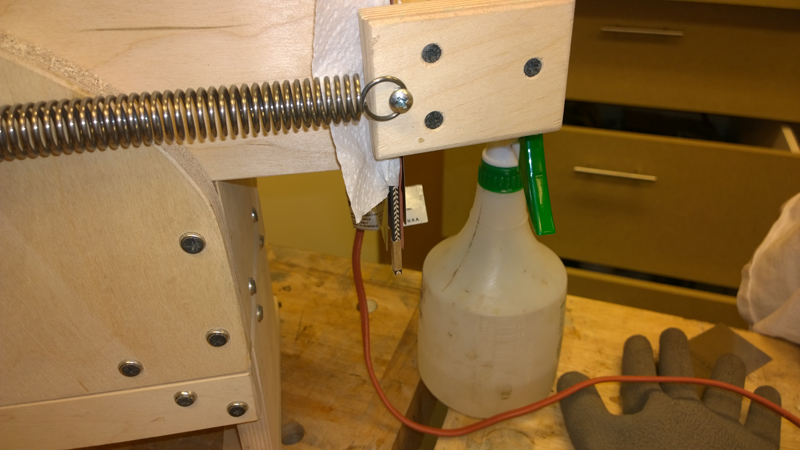
Time for a shot of Everclear! (I only really use it for shellac).
Those viewing my previous posts might have noticed I put in the x-braces before I put in the bridge plate. I normally do it in the reverse order and glue the bridge plate down on a flat surface. No big deal but when I did glue down the bridge plate I used my massive fiberglass slats to force the un radiused gluing caul down in the radius dish. Normally I used the much safer and friendlier fiberglass rods. Also in the pictures I sort of went back and forth between glued rough shaped braces and just radiused braces.
Sort of mixed into working on the top I also worked on the back bracing. Based on advise for the wood I am using and the purpose and size of the guitar I am building a non-live back guitar and have used four full height braces shaped with a plane to a near triangular shape. Trying to up my game on this back I took much care to get everything square and to have clean and square cuts into the back strip for the braces.
I first put 15' radius on all of the back braces. I use a combination of a plane to rough shape the radius and the sanding dish to finish it off. In the past I used the back strip as my guide for back braces. This guitar I made sure I had a straight edge to work with as you can see in the pictures. I used the straight edge and the square for all of the cuts I made with a scalpel and a new blade. The scalpel is so sharp there is no need for a saw as it cleanly and accurately cuts the slots. It worked out well as the braces pushed into the slots ended up square.
I went after the top and back braces with my chisels and block planes until I got the shape I wanted. Again trying to clean up my normal style I took more care to protect the plates while working on the braces. In the past I always ended up with some scratches deep scratches from the chisels. I ended relatively (to my past efforts) clean. Once I had the top braces to plan. I did tap tune them a bit mostly taking wood off of the finger and diagonal braces to the top felt alive. After the guitar is finished with the bridge on I may do some tuning from the sound hole based on the tops performance. I am happy where it is now it has some nice tap tones.
I fit the top and back to the rims. Here as well I have been trying to assure a tight fit from the beginning making sure to clearly center and carefully mark where the braces intersect the rims. Part of carfully marking the braces is I make sure that I can see and that I have access to mark them. While all of the tails of the braces are close in height I still individually set the my die grinder for each brace before I route the rebate into the kerfed linings on the rims. All in all the procedure went well for the top and the back.
With the top properly fitted, I rechecked that the angle on the top was right where I want it. The idea is a fret board extension flush to the top will be at the correct angle to give me the planned string height off the top at the saddle location. A 2.5 mm drill bit rolled up tight right at the saddle location.
Time for a shot of Everclear! (I only really use it for shellac).
-
johnnparchem
- Posts: 2354
- Joined: Sat Apr 10, 2010 10:50 pm
- Location: Seattle
- Contact:
Re: Number 13 - EIR\Sitka Drednought
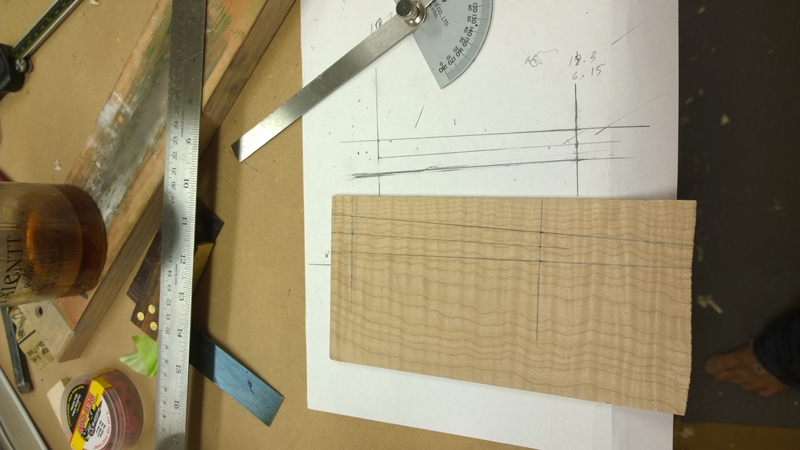
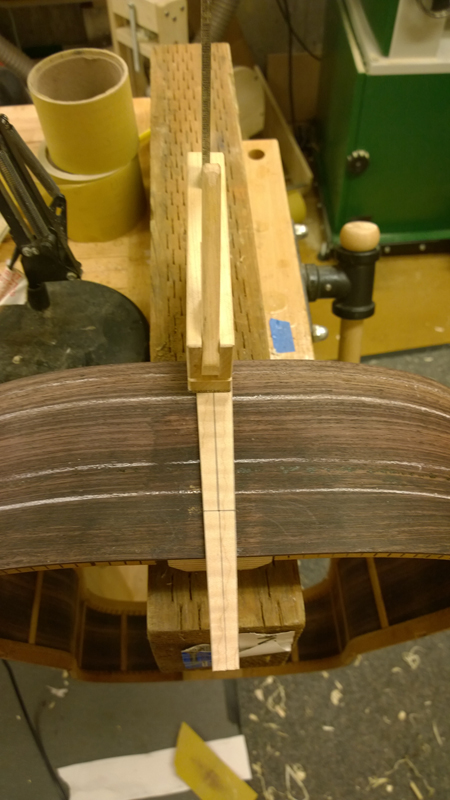
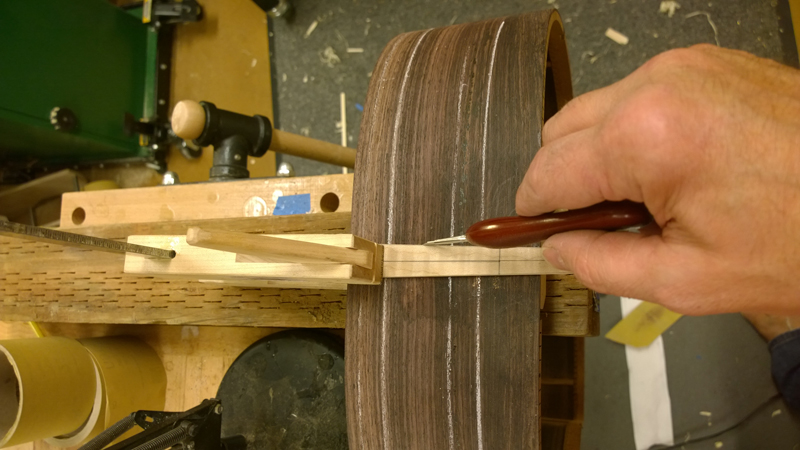
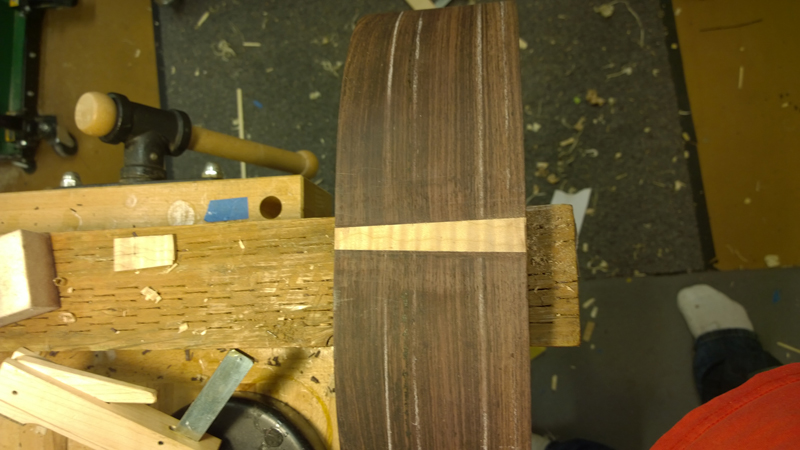
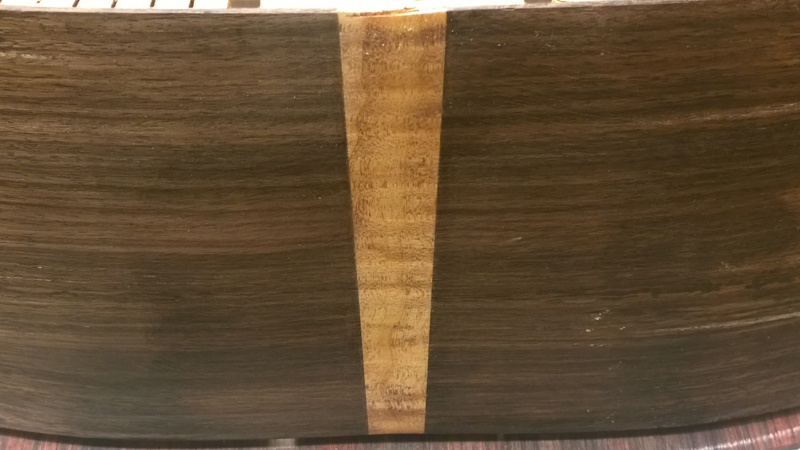
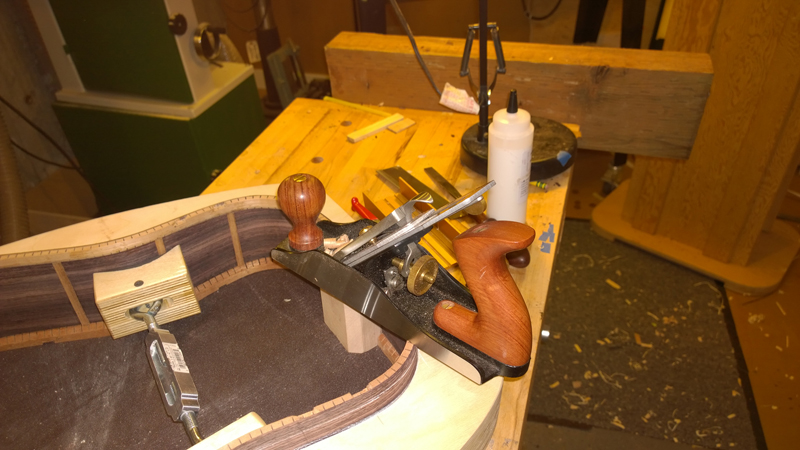
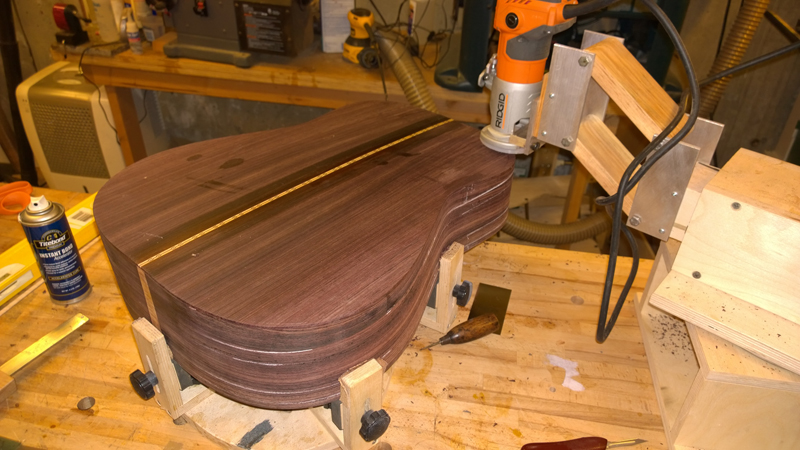
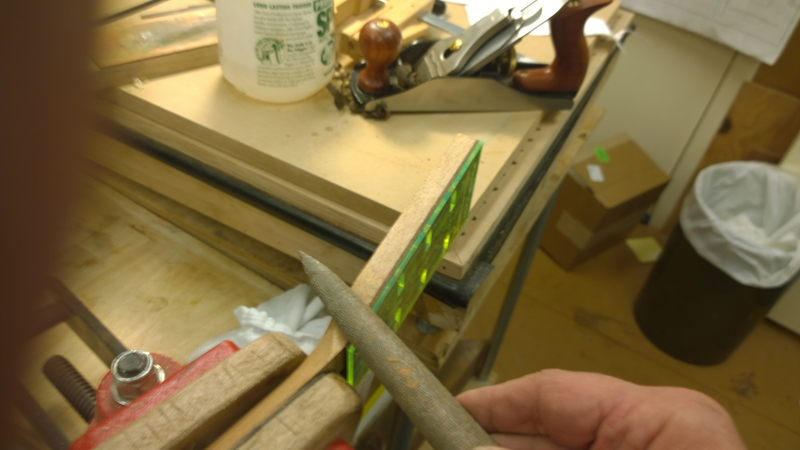
I used a bit of figured maple to make the end wedge. It is a relatively simple wedge without a black prufling strip. I went back and forth and finally decided if I could cut a clean channel a simple maple wedge would be fine. I think the only thing I started doing to achieve an accurate cut is to use a scalpel with a new blade instead of a razor saw. It takes a few passes with the scalpel but once the initial line is made it is easy to follow the cut. I had a couple of time on previous instruments where I slipped or managed to widen the cut while using a saw. Not shown is that I chiseled the waste out before I glued in the wedge. Being a wedge I probably could have gotten by with out clamps, but I clamped it down. ultimately it came our alright.
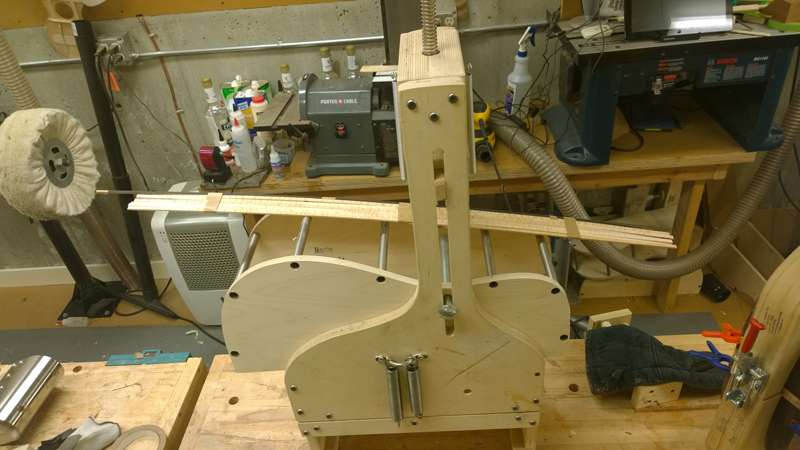
I used the fox style bending machine to bend both the bindings and the herringbone purfling. No problems bending the curly maple or the herringbone.
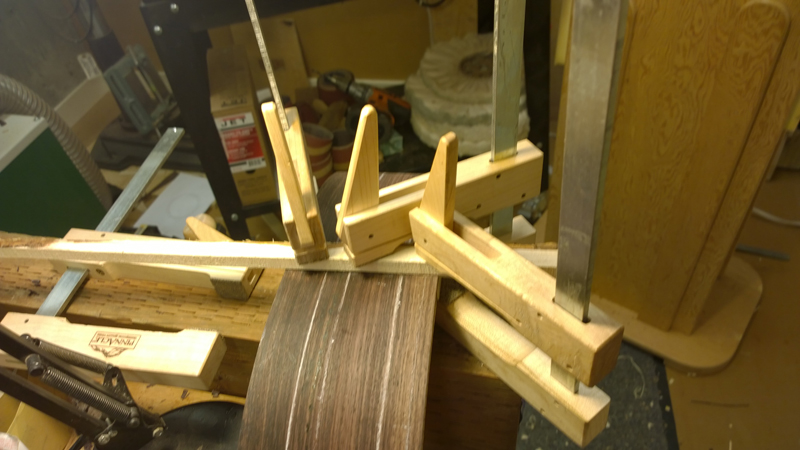
At this point I am nearly ready to close the box. I did add one step to my process, I use a 28' radius dish to profile the top rims including the heel block. To complement the flattened upper transverse brace, I took a couple of passes on the heel block with a plane to give a flat spot to glue the fret board.
flattened the heel block
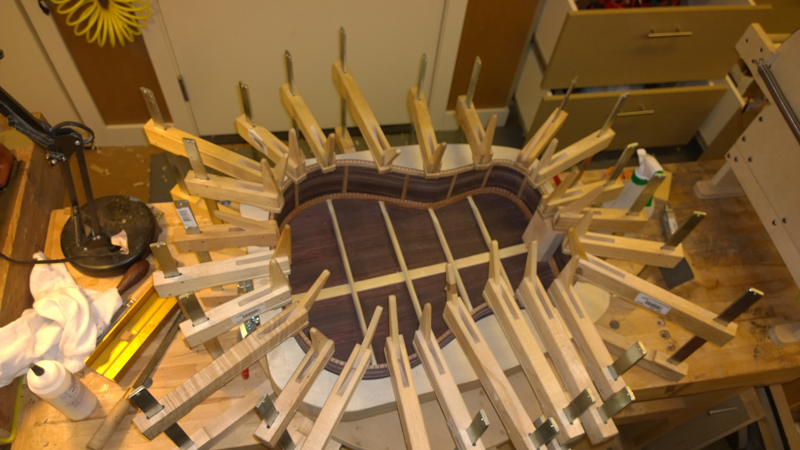
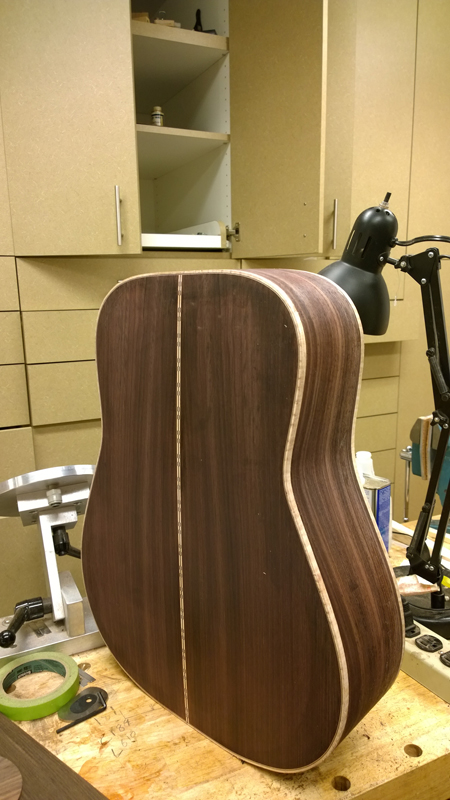
I glued the back on first. This gave me a chance to make the back look nice as it is the one people see through the sound hole. I used a flush cut bit to cut off the waste.
glued on the top.
The next shot is me keeping a promise. I completely leveled the sides before gluing on the bindings. I promised in my last build that I was not going to be stressed out about thin bindings when I still needed to sand the sides. I used a hand held drum sander with an inflatable bed.
Sorry no pictures but I cut out the binding channel and the purfling channel. I am not sure how I did it but I cut part of the channel on one side for the herringbone too deep. (.5 mm or so) I caught myself before I went to far. Luckily I bent 2 extra binding strips. I glued one in to the channel I cut too deep, leveled it and I re-routed the channel at the correct depth. It is all inside so nobody will see. It is structurally sound.
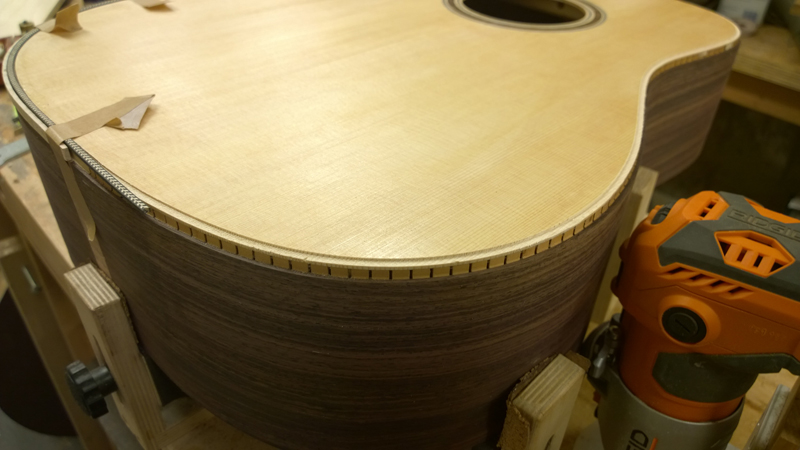
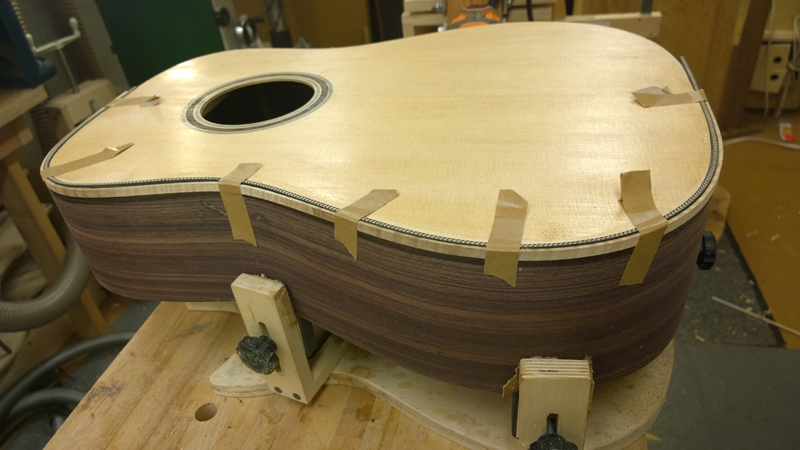
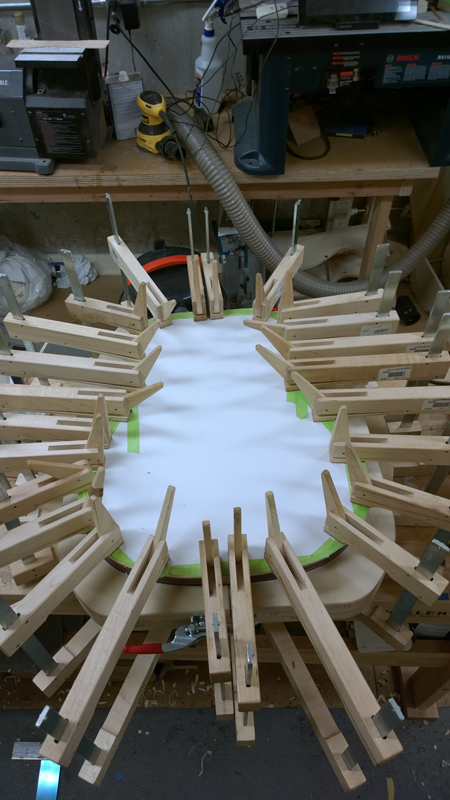
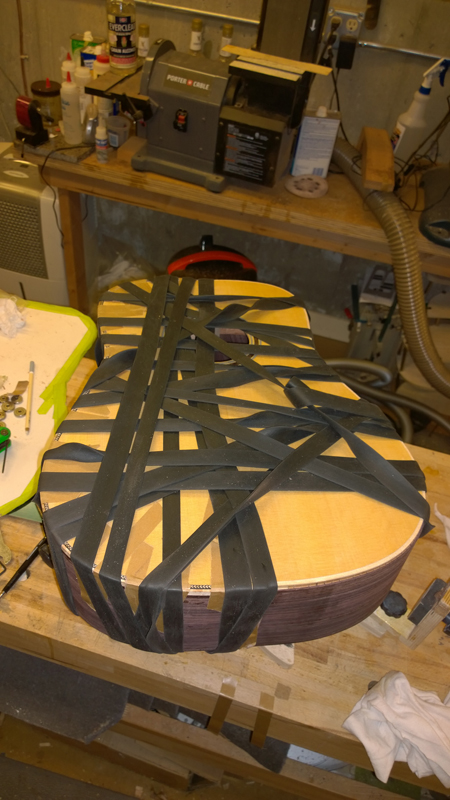
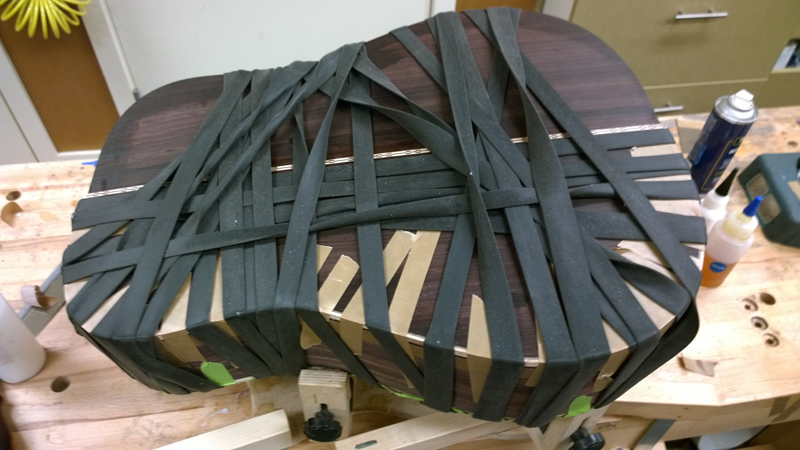
I also promised myself no more gaps in the binding. I glued up binding and herringbone and wrapped the bindings tight with my new rubber strip. It worked! More tomorrow.
I used the fox style bending machine to bend both the bindings and the herringbone purfling. No problems bending the curly maple or the herringbone.
At this point I am nearly ready to close the box. I did add one step to my process, I use a 28' radius dish to profile the top rims including the heel block. To complement the flattened upper transverse brace, I took a couple of passes on the heel block with a plane to give a flat spot to glue the fret board.
flattened the heel block
I glued the back on first. This gave me a chance to make the back look nice as it is the one people see through the sound hole. I used a flush cut bit to cut off the waste.
glued on the top.
The next shot is me keeping a promise. I completely leveled the sides before gluing on the bindings. I promised in my last build that I was not going to be stressed out about thin bindings when I still needed to sand the sides. I used a hand held drum sander with an inflatable bed.
Sorry no pictures but I cut out the binding channel and the purfling channel. I am not sure how I did it but I cut part of the channel on one side for the herringbone too deep. (.5 mm or so) I caught myself before I went to far. Luckily I bent 2 extra binding strips. I glued one in to the channel I cut too deep, leveled it and I re-routed the channel at the correct depth. It is all inside so nobody will see. It is structurally sound.
I also promised myself no more gaps in the binding. I glued up binding and herringbone and wrapped the bindings tight with my new rubber strip. It worked! More tomorrow.
Last edited by johnnparchem on Sun Jan 19, 2014 12:57 pm, edited 2 times in total.
-
tippie53
- Posts: 7013
- Joined: Fri Mar 03, 2006 7:09 pm
- Location: Hegins, Pa
- Contact:
Re: Number 13 - EIR\Sitka Drednought
nicely documented
how many splinters did you acquire?
how many splinters did you acquire?
John Hall
Blues Creek Guitars Inc
Authorized CF Martin Repair Center
president of Association of Stringed Instrument Artisans
http://www.bluescreekguitars.com
Blues Creek Guitars Inc
Authorized CF Martin Repair Center
president of Association of Stringed Instrument Artisans
http://www.bluescreekguitars.com
-
justrfb
- Posts: 217
- Joined: Wed Aug 22, 2012 8:17 am
- Location: North Jersey
Re: Number 13 - EIR\Sitka Drednought
Wow!!...Beautiful build and awesome work.
Sincerely,
Rich
Sincerely,
Rich
-
Kevin Sjostrand
- Posts: 3721
- Joined: Sat Feb 09, 2008 8:06 pm
- Location: Visalia, CA
Re: Number 13 - EIR\Sitka Drednought
Coming along nicely John. Are you sure you didn't nip the Everclear right before you routed for that binding? :>) Just kidding of course.
Good save.
Kevin
Good save.
Kevin
-
johnnparchem
- Posts: 2354
- Joined: Sat Apr 10, 2010 10:50 pm
- Location: Seattle
- Contact:
Re: Number 13 - EIR\Sitka Drednought
I was being so careful as well. I checked the router set-up multiple times with scrap wood. I am still baffled how it happened. I rechecked the test cut and it had the correct depth.Kevin Sjostrand wrote:Coming along nicely John. Are you sure you didn't nip the Everclear right before you routed for that binding? :>) Just kidding of course.
Good save.
Kevin
Thanks, Rich and John; Now that you mention it I got a cut under my right hand index finger nail. It is amazing how often that finger is used in life.
-
johnnparchem
- Posts: 2354
- Joined: Sat Apr 10, 2010 10:50 pm
- Location: Seattle
- Contact:
Re: Number 13 - EIR\Sitka Drednought
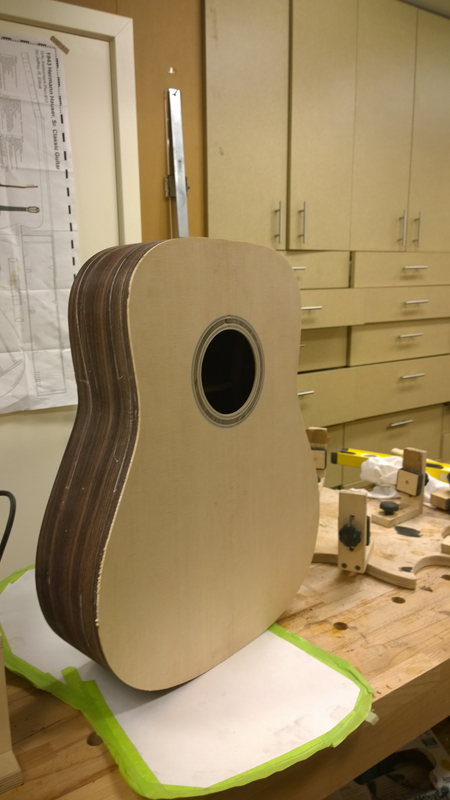
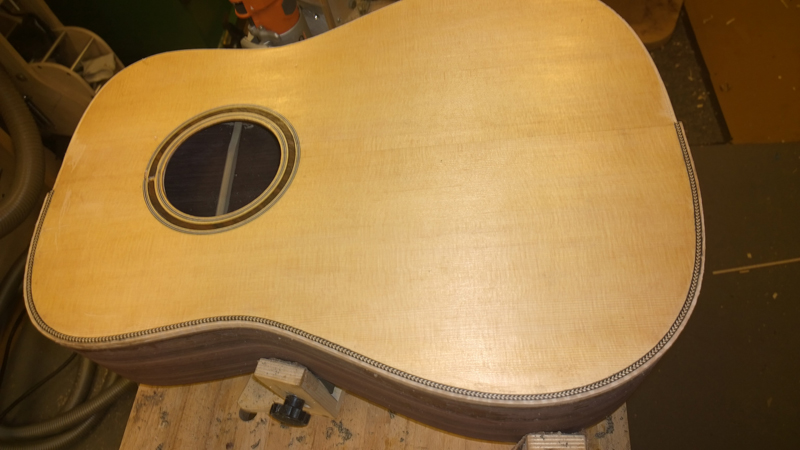
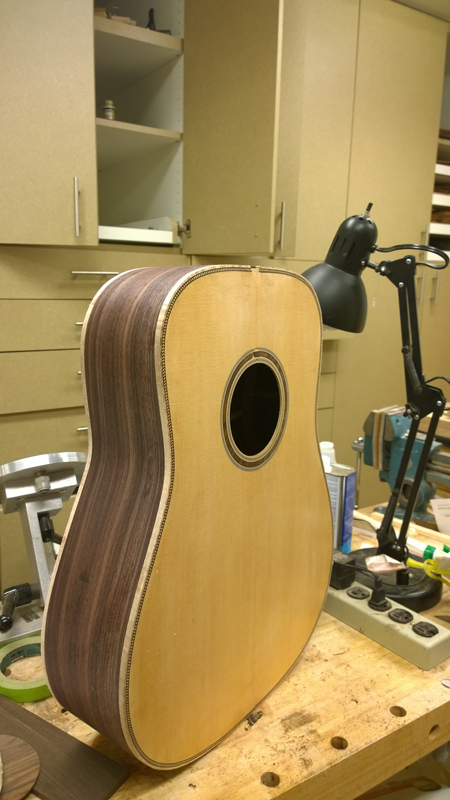
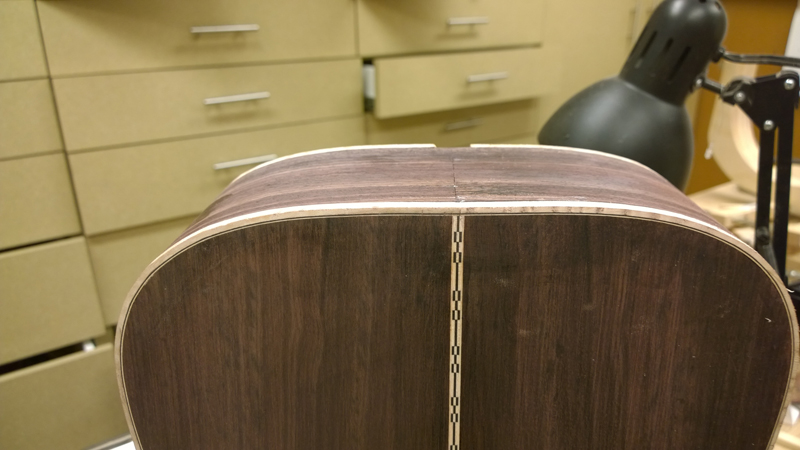
The rest of the binding went well with no mishaps. On the back I decides to add a BW purfling to the binding. The purfling maple matches the center strip and the black fiber frames the contrast with the bindings. I am liking the rubber strip for binding. For the first time ever I had no gaps to the plates or to the rims. I used LMI instrument glue for the binding, so I only did one strip at a time. The LMI glue does not have the longest open time. I think in the future I will use fish glue and at least bind both strips for the top or back together.
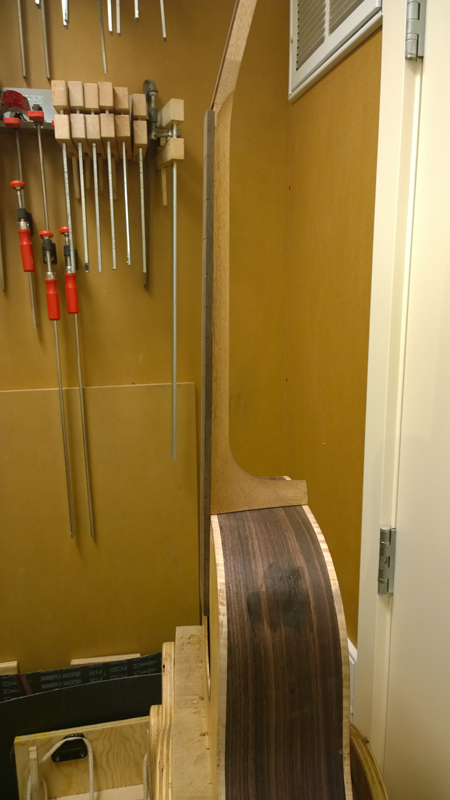
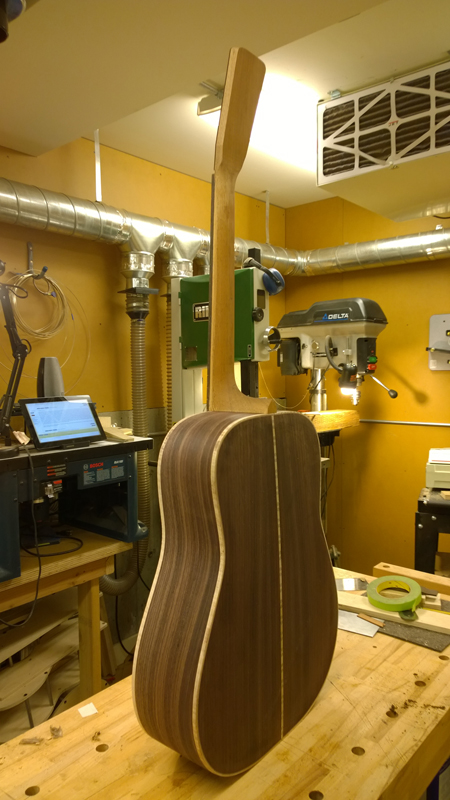
I had an a couple year old LMI neck with a matching heel block that I am using on this guitar. I drilled a couple of holes and used a flush cut bit to open the mortise. The neck is centered nicely and with only a little adjustment is at the correct angle.
I had an a couple year old LMI neck with a matching heel block that I am using on this guitar. I drilled a couple of holes and used a flush cut bit to open the mortise. The neck is centered nicely and with only a little adjustment is at the correct angle.
-
johnnparchem
- Posts: 2354
- Joined: Sat Apr 10, 2010 10:50 pm
- Location: Seattle
- Contact:
Re: Number 13 - EIR\Sitka Drednought
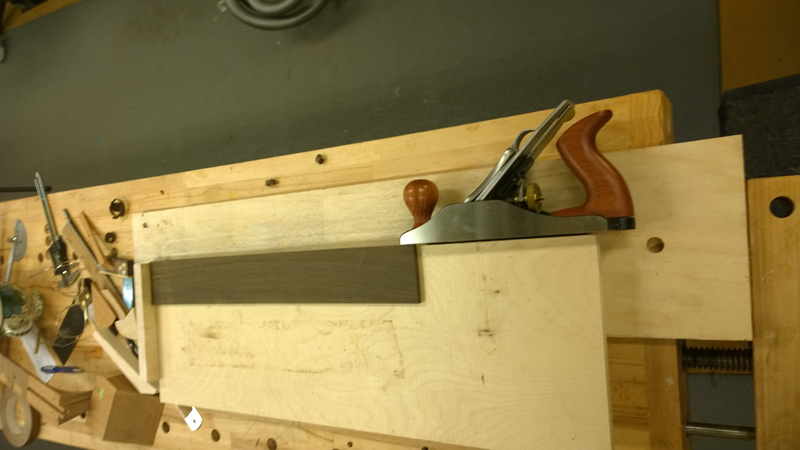
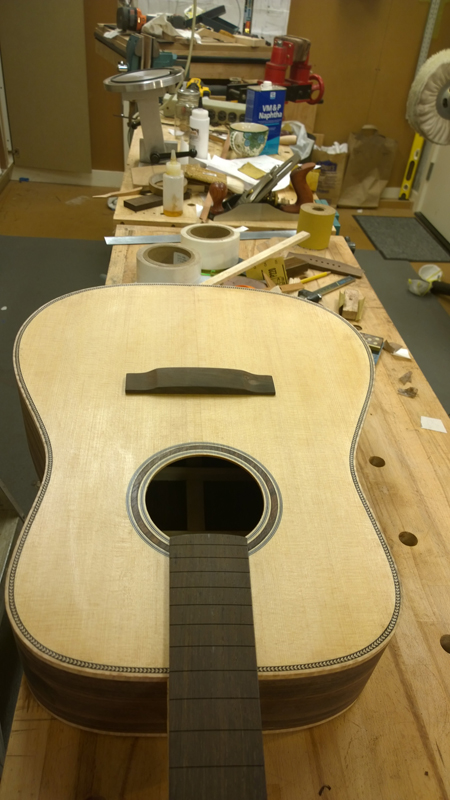
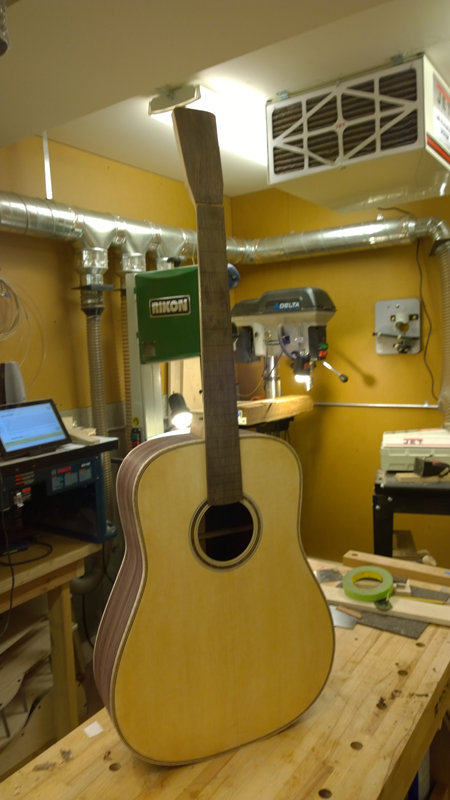
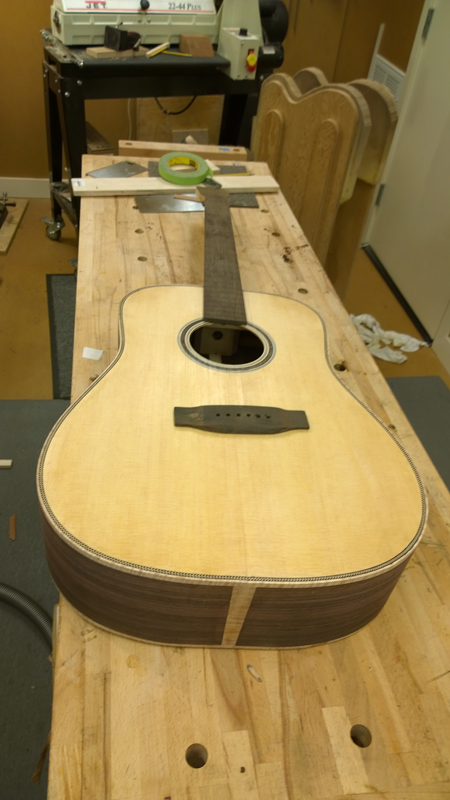
Since my last post, I glued on the headstock veneer and profiled it. I cut the slots and profiled the fret board and carved the bridge. I used Brazilian rosewood for these three parts.
Nothing too exciting, in any of these processes. For the head stock I rough cut the head stock profile out on the band saw, I sanded the nut edge of the headstock veneer to the correct angle first and carefully placed and glued it to the headstock (You can see in the pictures I had a little help). In the past I would use template following router bit to do the final profile, but seeing as I ruined multiple neck when this process went wrong I just shaped it by hand with a plane and a rasp.


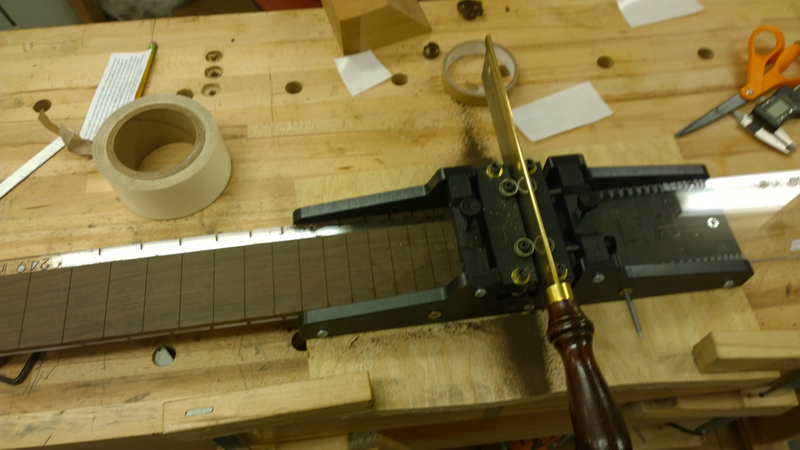
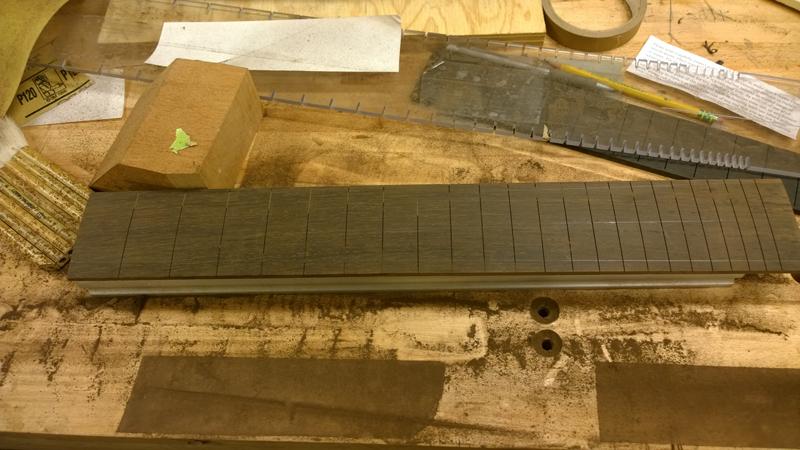
I use LMI's fretting jig and templates. The first thing I do is to get a straight edge on my shooting board to use as a reference through out the process. The jig and the saw make quick work of the fret board. The BRW is a lot easier to cut than the ebony I cut in the past. I use the long stewmac 16" radius bar to radius the slotted fret board. To make life easier I planed a rough radius on the fret board first.

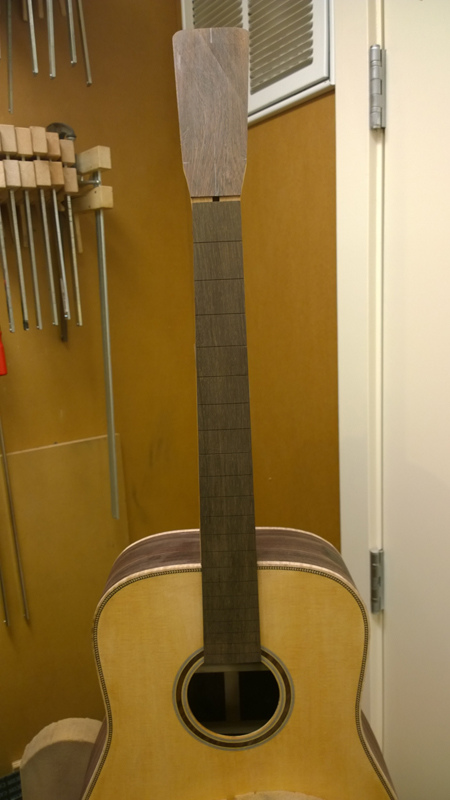
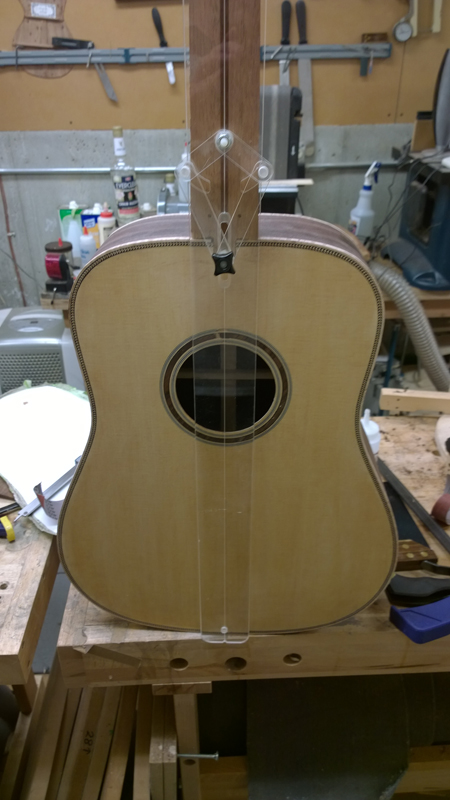
You can see I have a matching body and neck angle.
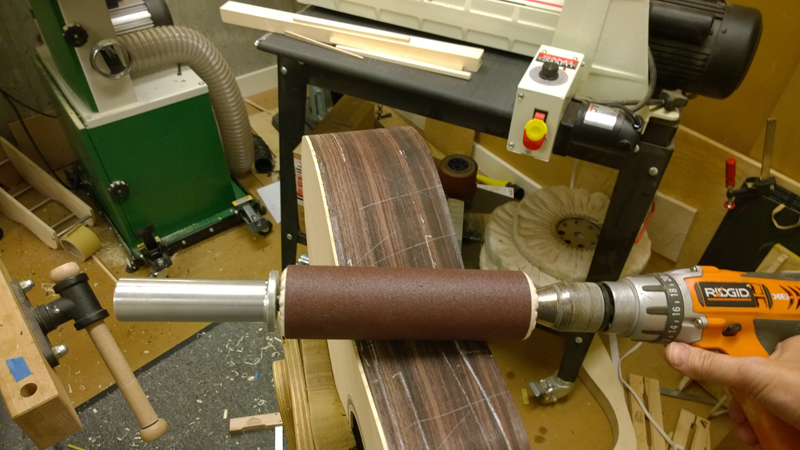
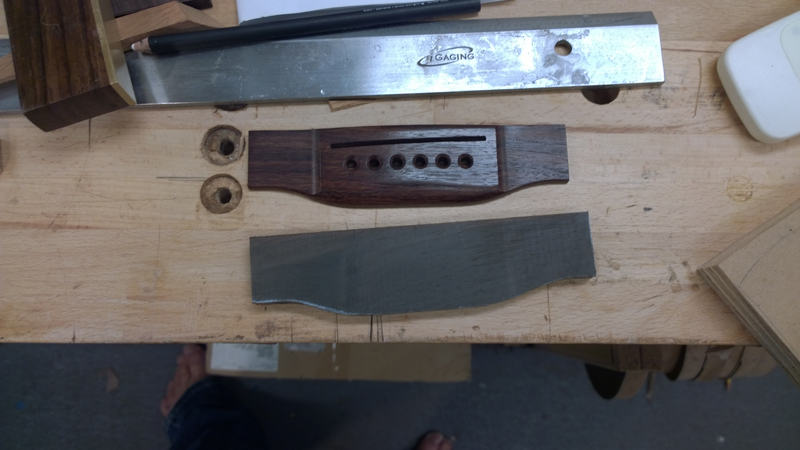
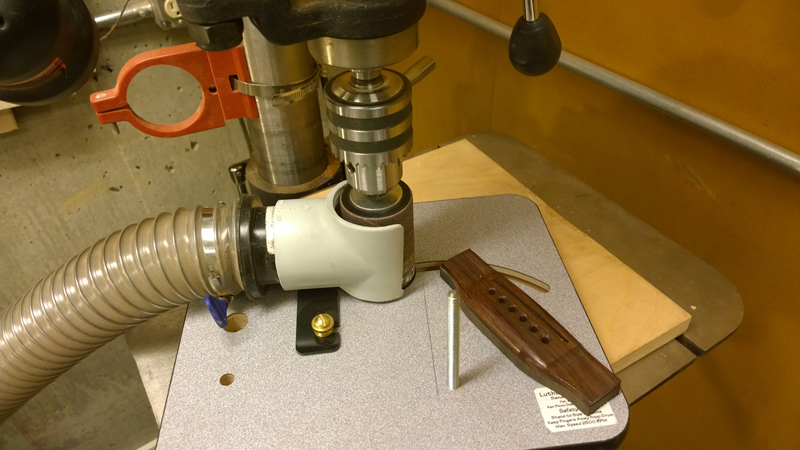
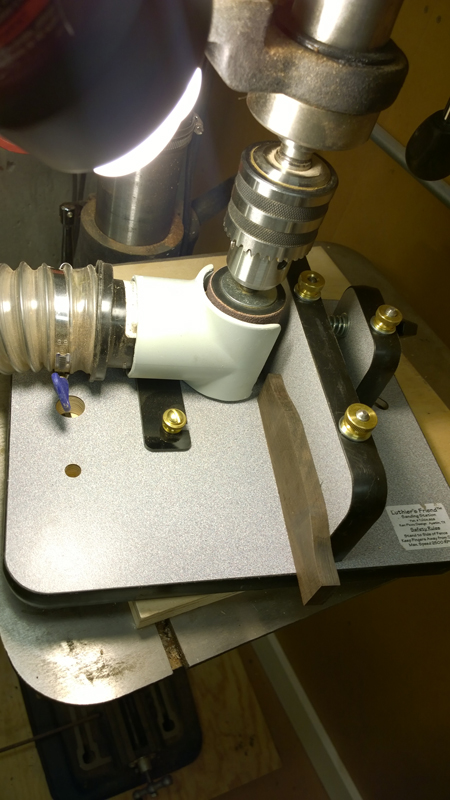
This is the first steel string bridge that I carved. I copied a martin style bridge as closely as I could. I cut out the rough shape on a Brazilian Rosewood bridge blank, did most of the profiling using my luthiers friend sanding station on a drill press. I used the drum as both a spindle sander for the shape and as a drum sander for the wings. I used my 16" radius bar to put a radius on the bridge itself to match the fret board bridge. I noticed that my store bought bridge had a 12" radius.


I still need to install the nut inserts into the neck tenon and glue on the fret board until I can start my finish prep, but I am getting very close.
Nothing too exciting, in any of these processes. For the head stock I rough cut the head stock profile out on the band saw, I sanded the nut edge of the headstock veneer to the correct angle first and carefully placed and glued it to the headstock (You can see in the pictures I had a little help). In the past I would use template following router bit to do the final profile, but seeing as I ruined multiple neck when this process went wrong I just shaped it by hand with a plane and a rasp.
I use LMI's fretting jig and templates. The first thing I do is to get a straight edge on my shooting board to use as a reference through out the process. The jig and the saw make quick work of the fret board. The BRW is a lot easier to cut than the ebony I cut in the past. I use the long stewmac 16" radius bar to radius the slotted fret board. To make life easier I planed a rough radius on the fret board first.
You can see I have a matching body and neck angle.
This is the first steel string bridge that I carved. I copied a martin style bridge as closely as I could. I cut out the rough shape on a Brazilian Rosewood bridge blank, did most of the profiling using my luthiers friend sanding station on a drill press. I used the drum as both a spindle sander for the shape and as a drum sander for the wings. I used my 16" radius bar to put a radius on the bridge itself to match the fret board bridge. I noticed that my store bought bridge had a 12" radius.
I still need to install the nut inserts into the neck tenon and glue on the fret board until I can start my finish prep, but I am getting very close.
-
johnnparchem
- Posts: 2354
- Joined: Sat Apr 10, 2010 10:50 pm
- Location: Seattle
- Contact:
Re: Number 13 - EIR\Sitka Drednought
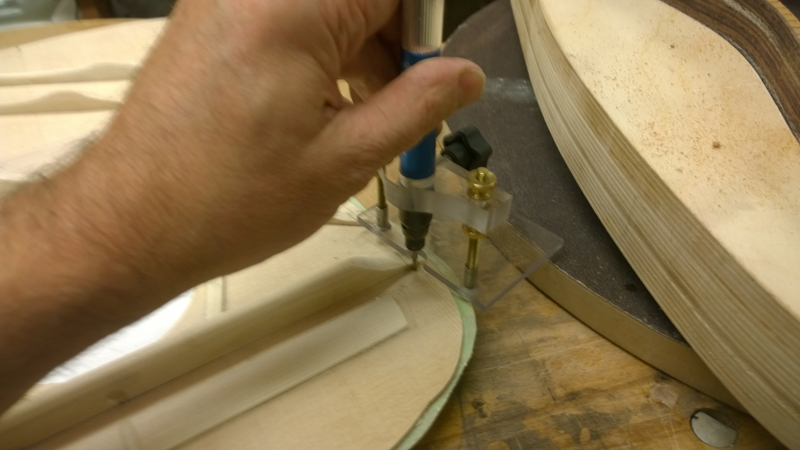
With the neck bolt inserts in and the fret board glued on I am ready to start finish prep, I still have a bit of fussing to do with the neck including the fret board inlays that I am waiting for.
and drill the tuner holes. Other than that I can start prepping the body.
and drill the tuner holes. Other than that I can start prepping the body.