
Thanks you all for the suggestions. I sorta went ahead and chopped off the neck block already... (I'm young and dumb). I think that what I did should work fine, probably a little messier than if I had just used an iron like what was suggested, but you live and learn I suppose. Maybe next time I'll actually sleep on it like I was going to. I posted pictures in my build thread of what I did for those who are interested. I am just happy to only be spending 15 plus shipping on a block as opposed to 150+ for everything I screwed up. Oh, by the way, it was titebond wood glue - the one with the red label. It was suggested by StewMac, it's what they used, and I could get it from Lowes for less than half of what they wanted for it =P.
Lessons learned:
1. Dont measure twice cut once, Measure 1001 times and glue once, apparently the 1000 times i checked weren't enough.
2. Wait a day for feedback from the forum before taking my dads advice.
First Acoustic Build - StewMac Kit
-
kjwilks
- Posts: 17
- Joined: Sat Apr 28, 2012 3:38 pm
Re: $150 mistake... oops.
Kevin
"Love, it will not betray you, dismay or enslave you. It will set you free."
-Mumford & Sons
"Love, it will not betray you, dismay or enslave you. It will set you free."
-Mumford & Sons
-
kjwilks
- Posts: 17
- Joined: Sat Apr 28, 2012 3:38 pm
Re: First Acoustic Build - StewMac Kit
Kevin,
First off, I like your name =P. Second, your suggestion was actually the first thing that came to mind, but it seemed like a lot of things that could have gone wrong if I had attempted that (I know myself too well). Plus I already have a thin guitar and don't really care for it for just that reason. I really like thicker bodied guitars.
Ken,
I wish I had waited before hacking away (literally, I used a hack saw for part of it), but what's done is done and I think it'll be alright. Thanks for the advice anyway. Hopefully I will continue building guitars enough in the future to have the opportunity to put that advice to good use.
John,
That's what I was thinking and you are right. Maybe I'll buy a tiny piece of koa veneer so i can tell my friends I made a koa guitar ;-). I've always wanted one of those koa Taylors...
Now for a few more questions.
I have never done binding before. I have a router but I don't have the bits necessary for routing bindings. Router bits tend to be pretty expensive, as is my tuition... What would you say to NOT routing this guitar. I really don't particularly care for the herringbone binding, so I wouldn't use that anyway. But having never made an acoustic guitar, I don't know if I should expect the glue joint to be plain ugly without it being covered by binding. And if I DO bind the guitar, where can I get the cheapest bits that aren't junk?
Also, I have been thinking about tools for quite a while. I was thinking about maybe getting some fretting tools, but having never done a fret job, i don't know what I can do without and what I need. I have a drawer full of files, will regular files work for fret jobs? I know StewMac has special ones with smooth edges so you don't mar the fretboard, but can I mask it and be super careful? I was thinking about getting the radiused sanding block, which I could use for leveling frets AND future fretboards. If I just got that for levelling frets, and then used files I already have for dressing, do you think that would work?
Please, if you have any other suggestions or comments about bindings, tools, etc., I would love to hear them. Even if it's a random tidbit that you learned along the way. This is a fun learning experience for me and I would love to hear about your experiences.
Kevin
"Love, it will not betray you, dismay or enslave you. It will set you free."
-Mumford & Sons
"Love, it will not betray you, dismay or enslave you. It will set you free."
-Mumford & Sons
-
kjwilks
- Posts: 17
- Joined: Sat Apr 28, 2012 3:38 pm
Re: First Acoustic Build - StewMac Kit
Also, Ken, I checked out your webpage and really like your work. I can't wait to see that curly mango project come together. I bookmarked your page. =)
Kevin
"Love, it will not betray you, dismay or enslave you. It will set you free."
-Mumford & Sons
"Love, it will not betray you, dismay or enslave you. It will set you free."
-Mumford & Sons
-
Kevin Sjostrand
- Posts: 3721
- Joined: Sat Feb 09, 2008 8:06 pm
- Location: Visalia, CA
Re: First Acoustic Build - StewMac Kit
The one advantage to leaving the block and re-contouring the top and back would be no patch job on the sides to recut the dovetail....but you will make it work! You might consider when you order your new heel block getting a single side for EIR and use that to patch.....might blend in so well that it wouldn't be noticeable. Just a thought.
Kevin
Kevin
-
kjwilks
- Posts: 17
- Joined: Sat Apr 28, 2012 3:38 pm
Re: First Acoustic Build - StewMac Kit
Hey everyone, It's been a while since my last update, so here are a few days worth of work. Slowly but surely, I make progress! However, I have been kinda slacking a bit in taking pictures of each step. I'll try and be more comprehensive in my picture taking.
I'll try clickable thumbnails instead of full photos for a change, maybe it will make the page load a little easier and make it a little shorter as well. If anyone has a preference, let me know.
I started on the back bracing... one at a time due to my lack of clamps with long reach. Here I have a radiused clamping caul underneath the brace. I think i posted a picture of that earlier. I am also using two pieces of scrap wood just for reach. I was careful that the scrap wood did not contact the rosewood at the neck-end of the back.
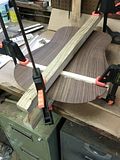
here is a picture where you can see the caul on the bottom
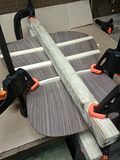
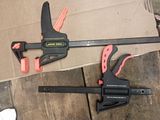
Moving forward with clamping the braces
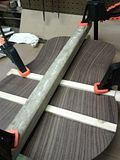
I was especially careful after the first brace that all the clamping force was applied to the brace that was actually being glued. I actually managed that pretty well. It helps that the braces were progressively taller.
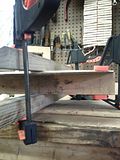
It was, of course, inevitable that I would eventually break one of these clamps.
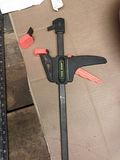
luckily, I had another clamp that just wasn't working well anyway. The clamping mechanism wasn't working (you could squeeze the handle tight, but it would loosen as you loosen your grip). So I just swapped the upper arms and turned two junk clamps into one usable clamp.
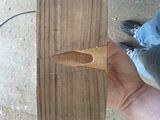
The new neck block came in on Monday, so first thing Tuesday I got that all glued and clamped. I let that sit for 24 hours and it came out pretty good =)
I'm pretty sure there will be enough scrap maple from the inside bit of the bridge that I could probably stick that in the gap. I was thinking I would use maple there anyway because I like the contrast. I'll wait on that and think about it though
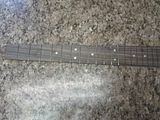
Got the pearloid dot inlays in the fretboard.
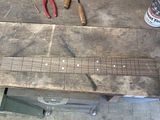
And today I installed the frets before helping my dad at work.
I posted in the tools forum a question in regards to fret files and what people use and prefer. I'm going to take my time and wait on the fretwork until I decide what I'm going to do exactly.
Thanks for looking!
I'll try clickable thumbnails instead of full photos for a change, maybe it will make the page load a little easier and make it a little shorter as well. If anyone has a preference, let me know.
I started on the back bracing... one at a time due to my lack of clamps with long reach. Here I have a radiused clamping caul underneath the brace. I think i posted a picture of that earlier. I am also using two pieces of scrap wood just for reach. I was careful that the scrap wood did not contact the rosewood at the neck-end of the back.

here is a picture where you can see the caul on the bottom

Moving forward with clamping the braces

I was especially careful after the first brace that all the clamping force was applied to the brace that was actually being glued. I actually managed that pretty well. It helps that the braces were progressively taller.

It was, of course, inevitable that I would eventually break one of these clamps.

luckily, I had another clamp that just wasn't working well anyway. The clamping mechanism wasn't working (you could squeeze the handle tight, but it would loosen as you loosen your grip). So I just swapped the upper arms and turned two junk clamps into one usable clamp.

The new neck block came in on Monday, so first thing Tuesday I got that all glued and clamped. I let that sit for 24 hours and it came out pretty good =)
I'm pretty sure there will be enough scrap maple from the inside bit of the bridge that I could probably stick that in the gap. I was thinking I would use maple there anyway because I like the contrast. I'll wait on that and think about it though

Got the pearloid dot inlays in the fretboard.

And today I installed the frets before helping my dad at work.

I posted in the tools forum a question in regards to fret files and what people use and prefer. I'm going to take my time and wait on the fretwork until I decide what I'm going to do exactly.
Thanks for looking!
Kevin
"Love, it will not betray you, dismay or enslave you. It will set you free."
-Mumford & Sons
"Love, it will not betray you, dismay or enslave you. It will set you free."
-Mumford & Sons
-
Kevin Sjostrand
- Posts: 3721
- Joined: Sat Feb 09, 2008 8:06 pm
- Location: Visalia, CA
Re: First Acoustic Build - StewMac Kit
I have a bunch of those HF clamps, and they will break if you try and clamp too hard. The first ones I bought about 4 years ago they all worked pretty well, but I bought 6 more a couple of months ago and probably 3 of them are like what you have, they will not stay clamped. They are cheap. I will not buy more. I will try and buy good quality clamps in the future.
Kevin
Kevin
-
kjwilks
- Posts: 17
- Joined: Sat Apr 28, 2012 3:38 pm
Re: First Acoustic Build - StewMac Kit
I hear ya there, Kevin. I kinda feel bad, because they are my dad's clamps. But like I told him, the one didn't even work in the first place, so after I broke the other, and combined the two into one usable clamp, there was still essentially the same number of clamps. That's reasonable right? lol
I tried making some luthier cam clamps, but I was using cheap soft wood. He told me about some old rock maple furniture wood that we have in the rafters of the garage that I could use for some decent clamps. Maybe I'll try that tomorrow.
I tried making some luthier cam clamps, but I was using cheap soft wood. He told me about some old rock maple furniture wood that we have in the rafters of the garage that I could use for some decent clamps. Maybe I'll try that tomorrow.
Kevin
"Love, it will not betray you, dismay or enslave you. It will set you free."
-Mumford & Sons
"Love, it will not betray you, dismay or enslave you. It will set you free."
-Mumford & Sons