Mark Stanley Bass Guitar finished, with a rough setup

Take us through building your guitar step by step. Post pictures and tell us what you're doing.
johnnparchem
Posts: 2354
Joined: Sat Apr 10, 2010 10:50 pm
Location: Seattle
Contact:

Mark Stanley Bass Guitar finished, with a rough setup

Post by johnnparchem »

With the Parlor guitar going in to the finsihing room, I pulled out my Mark Stanley Bass guitar kit that
I got this in August. I had started a topic in a different thread viewtopic.php?f=5&t=2232, but thought it better fit in the Blog your project area.
The guitar will have:
Red Cedar Top
Mahogany back and sides
Fretless Rosewood fingerboard with black fiber glued into the fret slots of a slotted finger board and ebony bindings.
It will have a few interesting features I need to work through. This guitar is suppose to have a pretty good unamplified sound, but it is still a bass so I will add both an acoustic pickup and an internal microphone plus an internal mixer. I am going to build an access port next to the end block for a battery mount and access to the electronics.

At this point, I have a mold and a template made, I need to hit the hardware store to get some parts to finish the internal clamps. The guitar is going to be huge. I include a picture of the may parlor guitar inside of the body mold of this bass guitar.


Image


Image


Image


Image

Image

Image
Last edited by johnnparchem on Tue May 01, 2012 2:48 am, edited 4 times in total.
Darryl Young
Posts: 1668
Joined: Fri Jul 30, 2010 6:44 pm
Location: Arkansas

Re: Mark Stanley Bass Guitar Kit

Post by Darryl Young »

I can't tell from the pictures, is this a 4 string bass? The bracing is interesting. Looks like a fun project.
Slacker......
tippie53
Posts: 7013
Joined: Fri Mar 03, 2006 7:09 pm
Location: Hegins, Pa
Contact:

Re: Mark Stanley Bass Guitar Kit

Post by tippie53 »

that back is cool
John Hall
Blues Creek Guitars Inc
Authorized CF Martin Repair Center
president of Association of Stringed Instrument Artisans
http://www.bluescreekguitars.com
johnnparchem
Posts: 2354
Joined: Sat Apr 10, 2010 10:50 pm
Location: Seattle
Contact:

Re: Mark Stanley Bass Guitar Kit

Post by johnnparchem »

Darryl Young wrote:I can't tell from the pictures, is this a 4 string bass? The bracing is interesting. Looks like a fun project.
Yup a four string bass.

I am researching acoustic pickup for Bass so if there is any good information out there ...

So far it looks like LR Baggs AB4 would work but I still need more information.
Kevin Sjostrand
Posts: 3721
Joined: Sat Feb 09, 2008 8:06 pm
Location: Visalia, CA

Re: Mark Stanley Bass Guitar Kit

Post by Kevin Sjostrand »

I like the curvy grain in the back. This will be a fun one to watch, well, then they are all fun to watch aren't they?

Kevin
johnnparchem
Posts: 2354
Joined: Sat Apr 10, 2010 10:50 pm
Location: Seattle
Contact:

Re: Mark Stanley Bass Guitar Kit

Post by johnnparchem »

Managed to get a bit of work done on the bass guitar. I completed the rims including radiusing top and bottom with a 40' radius. It will be interesting to see how the back comes out. The plans called for the top and bottom brace to have a 40' radius and the middle 2 braces to have a 32' radius. My guess is Mark wanted a larger radius but the guitar is so big that he damped it down a bit. I am following his plan to see how it comes out. I went with reverse kerfling, top and bottom. I used a trick that I saw in a video of misting the kerfling, both sides, and clamping it to the outside of the rim until dry. It worked really well shaping the kerfling making the gluing a little more straigh forwards. You can see in the picture that the shape at least held a bit.

I have the back finsihed; the back braces are huge. The braces are spanish cedar
For electronics I did order a LR Baggs elmenet active system, an under the saddle pickup.

On to the top after lunch.
DSC00725.jpg
DSC00732.jpg
DSC00733.jpg
You do not have the required permissions to view the files attached to this post.
Darryl Young
Posts: 1668
Joined: Fri Jul 30, 2010 6:44 pm
Location: Arkansas

Re: Mark Stanley Bass Guitar Kit

Post by Darryl Young »

Looks good John! I would love to hear this thing when you're done.
Slacker......
johnnparchem
Posts: 2354
Joined: Sat Apr 10, 2010 10:50 pm
Location: Seattle
Contact:

Re: Mark Stanley Bass Guitar Kit

Post by johnnparchem »

I braced the top minus the sanding, I followed the plan I got from Mark Stanley exactly, it is interesting that a completed body kit sort of did the opposite of me with regards to the transverse brace and the x-braces.
As shown in the picture I terminated the top of the x-braces into the massive transverse brace. The transverse brace for me goes into the sides, which will give the support I want for the x-brace.

A kit that I saw partially completed online terminated the x-braces into the rim and cut the transverse brace short to allow the x-braces to cross.

I followed the plan (I want to make a Mark Stanley:)but I was wondering if others had opinions on the two choices.

My braces:
DSC00734.jpg
DSC00736.jpg
You do not have the required permissions to view the files attached to this post.
johnnparchem
Posts: 2354
Joined: Sat Apr 10, 2010 10:50 pm
Location: Seattle
Contact:

Re: Mark Stanley Bass Guitar Kit

Post by johnnparchem »

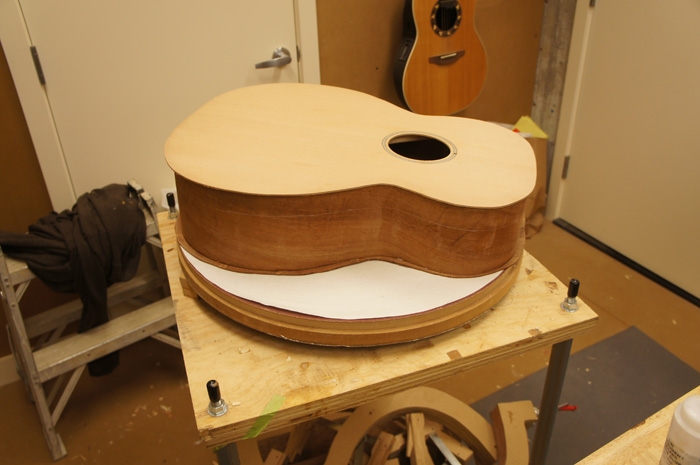
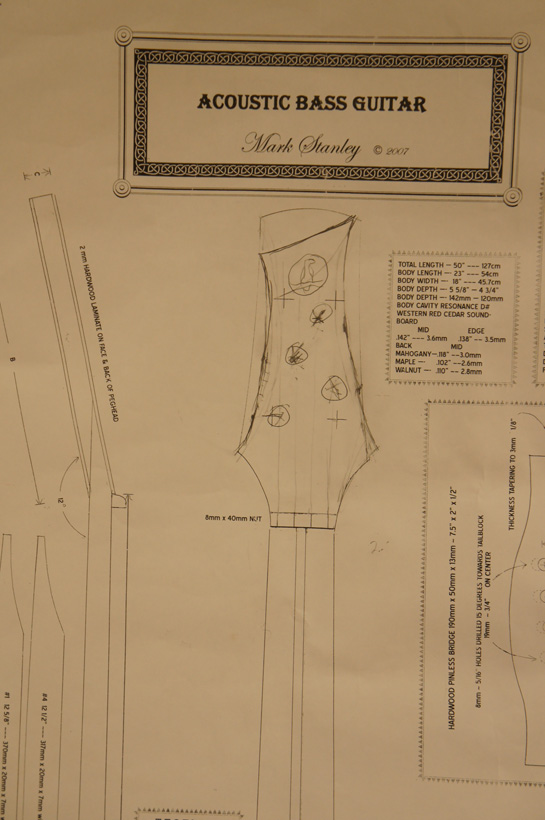
I have never played an acoustic bass. Some consider an acoustic bass guitar an oxymoron. When I looked on the web for acoustic guitars I mostly found what is really a solid body guitar. Some were made to look a little acoustic but the “acoustic” body hid what was basically a 2/4 under bridge that the neck attached to. I gather that acoustic meant a piezoelectric transducer under the saddle. I wanted a real acoustic instrument. From everything I read on web it seems this guitar was the closest to performing as a true acoustic and could hold its own with other guitars. I guess to achieve this performance the guitar is ridiculously huge. Look at the last photo with it on top of a stack of two full sized radius disks.

We will see I am putting a LR Baggs active element under the saddle transducer as well.

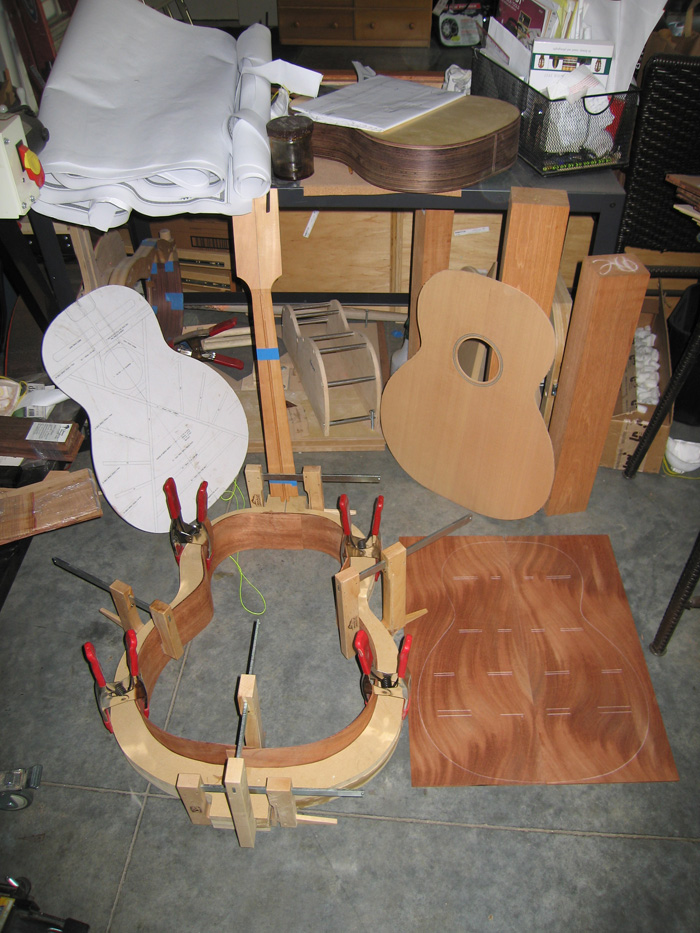
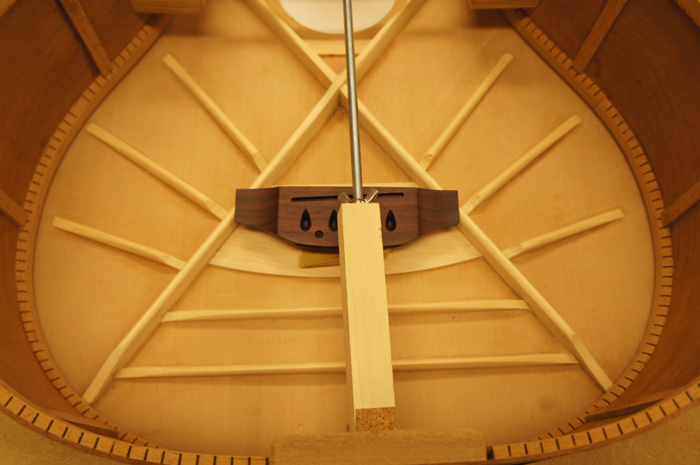
I have the bracing finished and glued the back on the RIMs I still need to put the end wedge in so I held off gluing the top. Being able to hang the rim on a board while cutting the end wedge makes the job a little more manageable.

I have started to pick out the trim for the guitar. I am going to use black fiber bindings; I can put them on without bending them. For the top I will bend herringbone purflings. On the back I will use bwb purling. I decided on an ebony peg board veneer. I am going to put a veneer on the back of the peg board as well. I am still deciding on what to use. I am planning on picking a veneer and using it for the back pegboard, heal cap and end wedge.

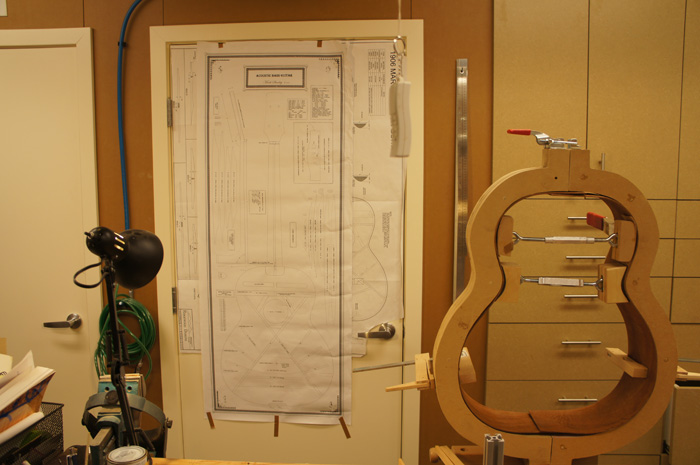
I played around with a rough peg board shape. I want the strings to run straight to the nut so that dictates the shape somewhat. I included a picture of my sketch on the plans. My tuner holes are the messy Xes. I will keep the tuners the same distance from the side. So I laid the tuning holes on the sting lines and placed a dot the correct distance toward the side. Then I just drew curves to tie all of the points together.

Image


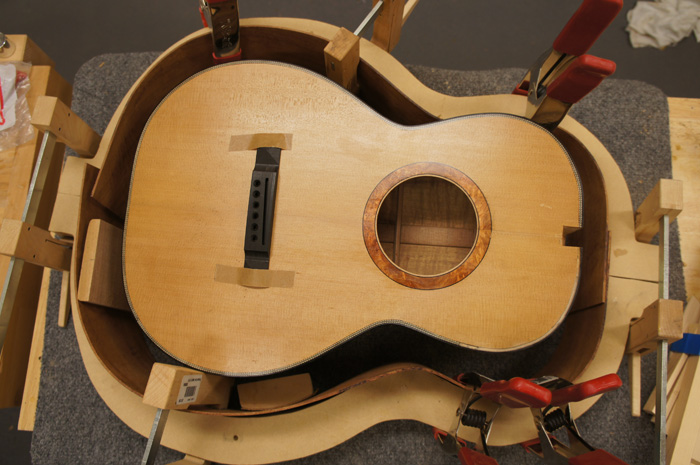
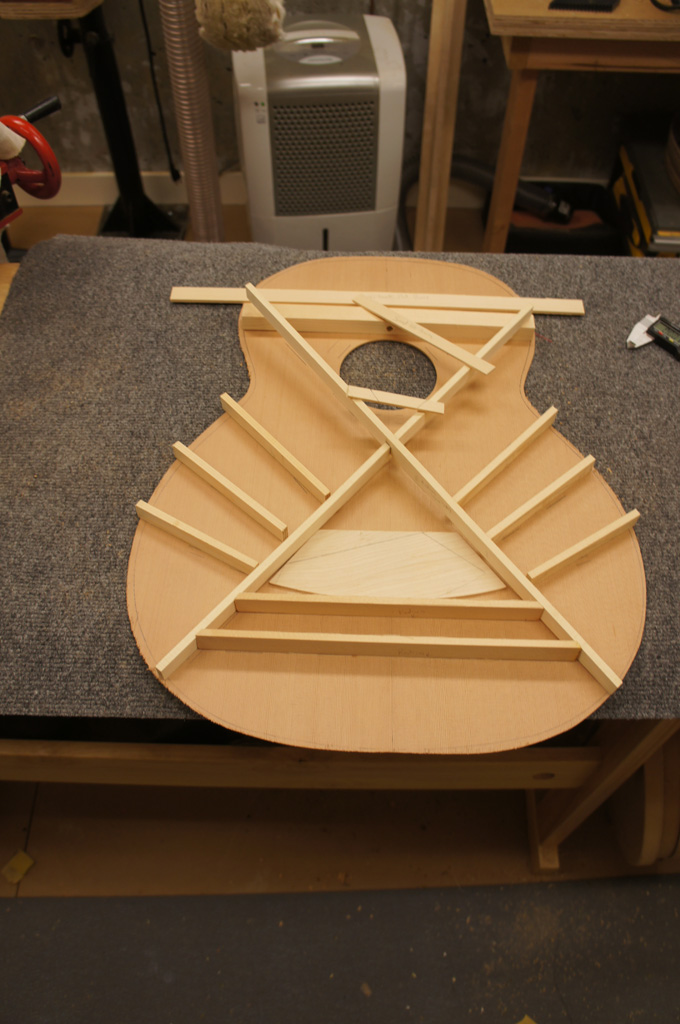
The top bracing is a bit weird with the x-brace terminating in a massive transverse brace. It took me a bit to figure out why it was done that way. It finally dawned on me that while the guitar is oversized the bridge is not. To keep the x-brace underneath the bridge and optimally place the brace under the sound hole the X hits the transverse brace instead of the rim. I tucked them into the brace.

Image

Image

Image

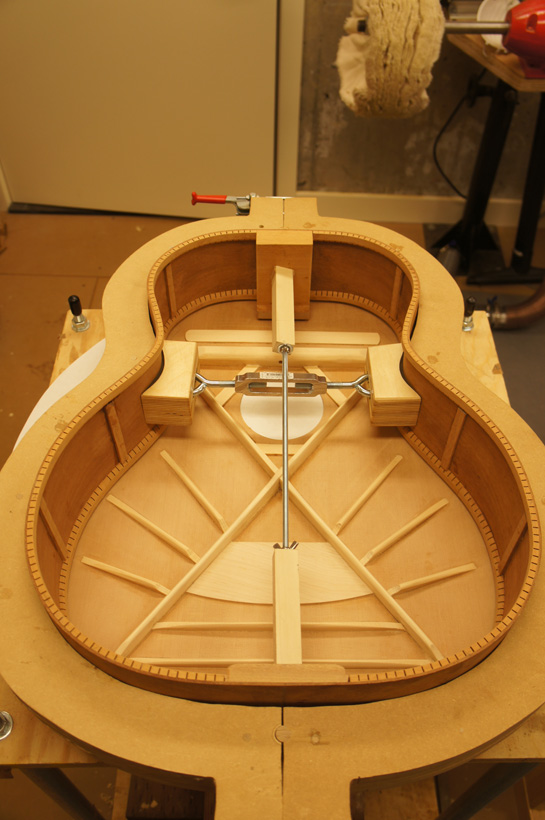
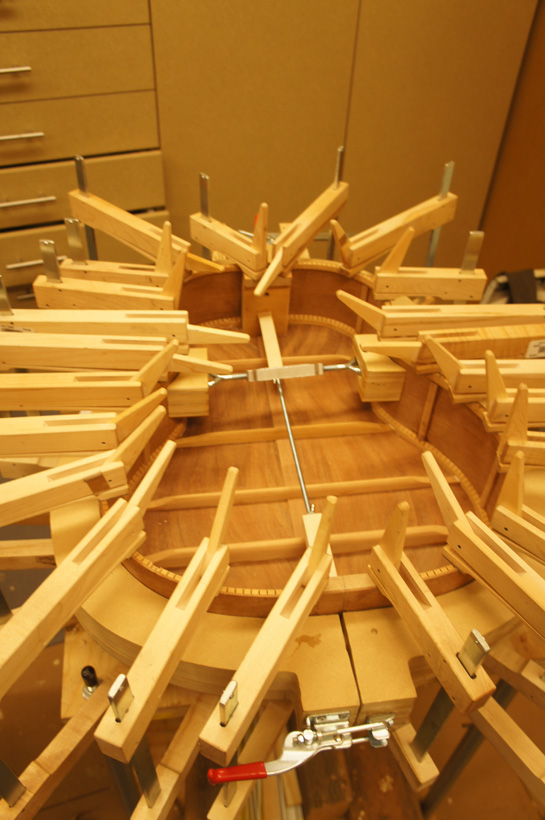
I used up every clamp I had to glue on the back. The back really fit well so I probably could of gotten by with a lot less. In any case I cannot see light coming into the guitar from the back seam.

Image


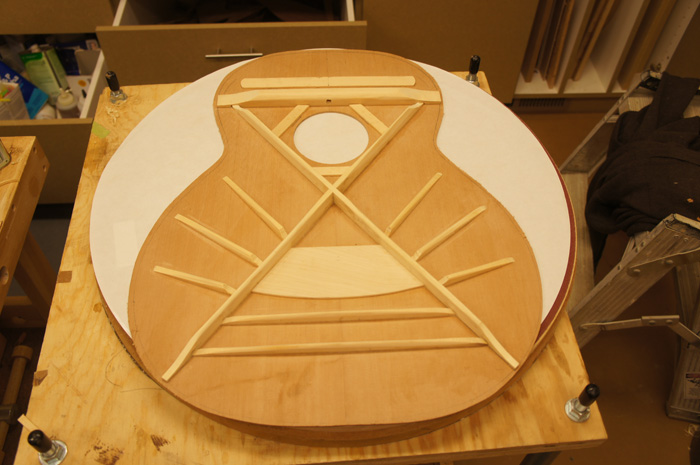
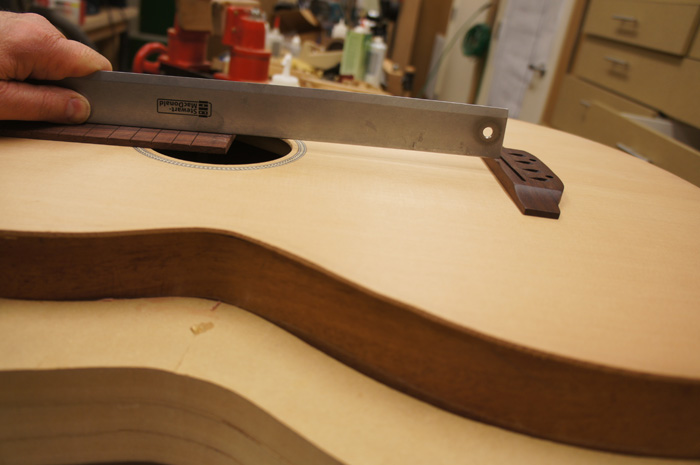
The top has a 40 foot radius with the middle 4 inches of the transverse brace flat. The top came out right where I wanted it. The height off the bridge with a straightedge the is just a bit above the bridge with no frets. I had to think about that for awhile as I am building a fretless guitar. I thought about having a higher angle to compensate for the loss of the fret (.5 mm at the bridge). But then I decided the height of the string off the top was my first concern, secondly a base guitar should have a bit more action anyway. But really I have no idea what it ideal means when playing fretless. I guess I will find out.

Image

It is HUGE!

Image
Kevin Sjostrand
Posts: 3721
Joined: Sat Feb 09, 2008 8:06 pm
Location: Visalia, CA

Re: Mark Stanley Bass Guitar Kit

Post by Kevin Sjostrand »

John, this is looking great. It is really big. I see fret slots in the board you are measuring the bridge height on, are you putting in something that will be flush on the surface, but give fret locations?
Did you make that bridge? If so, how did you do the tear drop shaped peg holes?

Kevin
Post Reply