
Well, the binding is done.
It wasn't terribly fun. The binding was pretty badly twisted and had some nice kinks in it. It was a serious battle of wills, but I *think* I prevailed (assuming I don't get up in the morning and find the bindings have fallen off onto the floor).
The wedge match isn't as bad as I thought, but I still think I will be more careful to have matching woods next time. The picture doesn't really do a good job of highlighting the variation in the grain and color. Fortunately the jointery isn't too bad, so it doesn't draw too much attention to the joints.
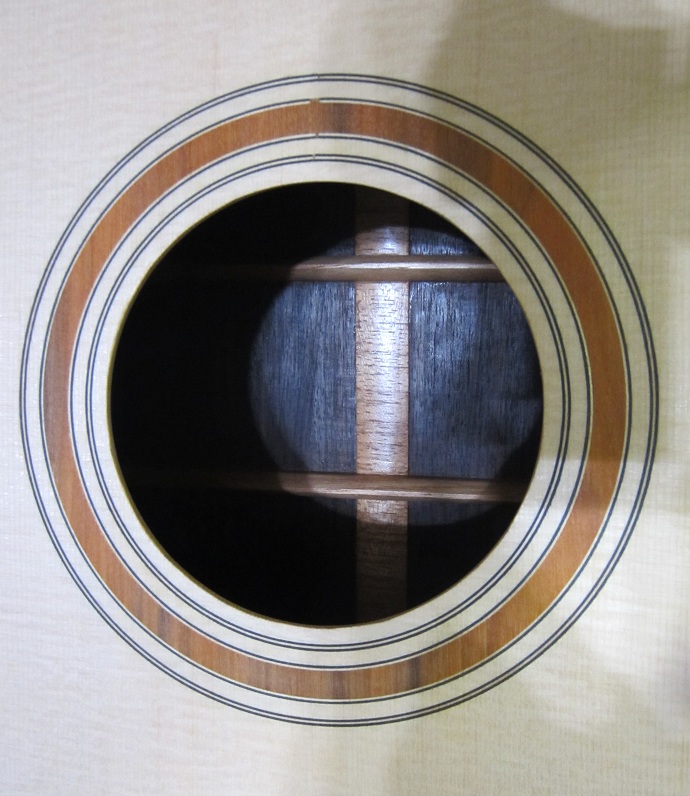
And here is the blurry rosette. It was a lot more orange than the bindings, which I knew going in. The contrast there is actually pretty nice.
Jim's Dreadnought Build
-
Jim_H
- Posts: 506
- Joined: Tue Sep 06, 2011 2:51 pm
- Location: Bothell, WA USA
Re: Crazy Cocobolo!
You do not have the required permissions to view the files attached to this post.
My poorly maintained "Blog"
-
johnnparchem
- Posts: 2354
- Joined: Sat Apr 10, 2010 10:50 pm
- Location: Seattle
- Contact:
Re: Crazy Cocobolo!
The wedge looks good with the binding and sides. I like your rosette as well. I have some cocobolo I bought on Ebay but have not decided what I will use it for.
-
Darryl Young
- Posts: 1668
- Joined: Fri Jul 30, 2010 6:44 pm
- Location: Arkansas
Re: Crazy Cocobolo!
Wow, nice job Jim! I'm considering using a purfling line on my binding and mitering at the end graft like this.
Did you glue the purfling line to the binding before bending? If so, what glue did you use and how did you clamp it while drying? Did it tend to come loose while bending?
Did you glue the purfling line to the binding before bending? If so, what glue did you use and how did you clamp it while drying? Did it tend to come loose while bending?
Slacker......
-
David L
- Posts: 1319
- Joined: Thu Jan 06, 2011 8:04 pm
- Location: Slidell, La
Re: Crazy Cocobolo!
It sure came out really nice Jim! How did you get the non-conforming binding to conform and what glue did you use?
David L
David L
-
Jim_H
- Posts: 506
- Joined: Tue Sep 06, 2011 2:51 pm
- Location: Bothell, WA USA
Re: Crazy Cocobolo!
The bindings came from LMI with a .010 maple purfling on one of the edges.
I pre-laminated a .250 x .010 maple purfling to the inside edge of the back bindings using thin CA so it would mate up to the .10 maple purfling line on the back bindigs.
I used a herringbone strip around the top between the binding and the top. Now that I see what this looks like, I probably should have saved these for a different guitar and gone with a .020/.020 b/w purfling instead.
On the top, I glued the herringbone in with LMI white clue by itself. I was careful not to get too much glue in the channel, and I made sure the fit was good and clean all the way around, as the outside edge of the purfling was also the inside edge of the binding. I cleaned up what little squeeze out there was using de-glue goo.
This gave me a nice buffer between the binding and top. I did this because the LMI 'serviced' bindings were very squirrely. Especially around the tighter bend at the waist and upper bought, and I determined with a dry run that tape was not going to hold it in place in those areas without leaving significant gaps, especially on the back near the waist (which is always a trouble spot).
Unfortunately, my decision to pre-laminate the purfling to the bindings on the back probably exacerbated the problems, because it made it all the more difficult to force them into submission. I relieved the iniside corner edge of all of the bindings, which definitely helped.
I ended up using thin CA to glue them, and because the purfling miters are at the tail, I started at the wedge and worked my way forward. To make the miters I just trimmed the purfling where it crosses over the wedge piece and were it meets the back strip. The back strip and wedge were cut .010 long (so they extended into the binding channel by .010), and then trimmed the purfling line from there edges where the bindings meet. I made the cuts at 90 degrees. My camera isn't capable of focusing close enough to see them, but the miter's being 90 degrees is noticeable. I really should have taken the extra time to make them at 45.
As far as forcing my will on the bindings, I worked on small sections at a time, using a pair of Bessey "DuoKlamps". One 12" for across the waist and the sides, and one longer one for clamping the long way. The bindings were so badly twisted in some areas that I was only able to clamp a few inches at a time. In some areas, specically in the waist area on the back, I used the shorter clamp to pull the binding down into the channel, and used the longer one to pull it into the channel.
All in all, considering the challenges that were built in, they came out pretty good. There were a few small gaps after I was done, that wouldn't succumb to the clamps. They were small enough that I was able to fill them by using a small sliver of wood from the back that I shaved off using a plane and wicking in some thin CA. Also, there is one spot on the upper bought, on the back, lower side, where I couldn't completely overcome the twist, and when I scraped the bindings level, they got a little thin.
This binding and back/sides set came from LMI "Serviced", meaning pre-bent and with the center strip glued in. This was something I bought a couple of years ago, and had been sitting collecting dust. I decided to build with it as a means to get back into building before I start some 'from scratch' projects I have planned. I knew going it that this was going to be difficult to fit, but was determined not to let this stuff go to waste, and to make the best out of it. On my next two dreadnoughts (I have enough 'parts' to build 3), I'll be bending and using bindings I cut myself, and don't expect to have as much trouble. Normally I would use tape and LMI white glue to glue in my bindings, but used CA this time because of the gnarlyness of the bindings. I don't know if they came this way from LMI or if they twisted and rolled sitting my shop for two years.
Like I said, all things considered, I'm happy with it. My goal was to re-learn how to do some of this stuff after a long layoff, and in that sense this was 100% a success.
By the way, these DuoKlamps are excellent for this purpose and will probably have a lot of other uses in lutherie. Because of the double clamping surface there is a lot of flexibility in how you can use them. They basically have four contact points available. The grip pads are wider than the clamp which means you can lay them flat and use the almost like a traditional bar clamp only with twice as many contact points. I hadn't considered it before, but you could probably use these to join backs and tops with them laying on their sides on top of the plates.The pads are hard enough to provide a sturdy clamping surface, but soft enough to 'grab' on the curved sides without sliding down the curves. I currently have four of them. Two 12" and two 18". They aren't cheap, but I'll probably pick up a few more of these at some point.
Here is what they look like.

I'm not at the shop today, but will be a bit later. I'll try to get some pictures.
I pre-laminated a .250 x .010 maple purfling to the inside edge of the back bindings using thin CA so it would mate up to the .10 maple purfling line on the back bindigs.
I used a herringbone strip around the top between the binding and the top. Now that I see what this looks like, I probably should have saved these for a different guitar and gone with a .020/.020 b/w purfling instead.
On the top, I glued the herringbone in with LMI white clue by itself. I was careful not to get too much glue in the channel, and I made sure the fit was good and clean all the way around, as the outside edge of the purfling was also the inside edge of the binding. I cleaned up what little squeeze out there was using de-glue goo.
This gave me a nice buffer between the binding and top. I did this because the LMI 'serviced' bindings were very squirrely. Especially around the tighter bend at the waist and upper bought, and I determined with a dry run that tape was not going to hold it in place in those areas without leaving significant gaps, especially on the back near the waist (which is always a trouble spot).
Unfortunately, my decision to pre-laminate the purfling to the bindings on the back probably exacerbated the problems, because it made it all the more difficult to force them into submission. I relieved the iniside corner edge of all of the bindings, which definitely helped.
I ended up using thin CA to glue them, and because the purfling miters are at the tail, I started at the wedge and worked my way forward. To make the miters I just trimmed the purfling where it crosses over the wedge piece and were it meets the back strip. The back strip and wedge were cut .010 long (so they extended into the binding channel by .010), and then trimmed the purfling line from there edges where the bindings meet. I made the cuts at 90 degrees. My camera isn't capable of focusing close enough to see them, but the miter's being 90 degrees is noticeable. I really should have taken the extra time to make them at 45.
As far as forcing my will on the bindings, I worked on small sections at a time, using a pair of Bessey "DuoKlamps". One 12" for across the waist and the sides, and one longer one for clamping the long way. The bindings were so badly twisted in some areas that I was only able to clamp a few inches at a time. In some areas, specically in the waist area on the back, I used the shorter clamp to pull the binding down into the channel, and used the longer one to pull it into the channel.
All in all, considering the challenges that were built in, they came out pretty good. There were a few small gaps after I was done, that wouldn't succumb to the clamps. They were small enough that I was able to fill them by using a small sliver of wood from the back that I shaved off using a plane and wicking in some thin CA. Also, there is one spot on the upper bought, on the back, lower side, where I couldn't completely overcome the twist, and when I scraped the bindings level, they got a little thin.
This binding and back/sides set came from LMI "Serviced", meaning pre-bent and with the center strip glued in. This was something I bought a couple of years ago, and had been sitting collecting dust. I decided to build with it as a means to get back into building before I start some 'from scratch' projects I have planned. I knew going it that this was going to be difficult to fit, but was determined not to let this stuff go to waste, and to make the best out of it. On my next two dreadnoughts (I have enough 'parts' to build 3), I'll be bending and using bindings I cut myself, and don't expect to have as much trouble. Normally I would use tape and LMI white glue to glue in my bindings, but used CA this time because of the gnarlyness of the bindings. I don't know if they came this way from LMI or if they twisted and rolled sitting my shop for two years.
Like I said, all things considered, I'm happy with it. My goal was to re-learn how to do some of this stuff after a long layoff, and in that sense this was 100% a success.
By the way, these DuoKlamps are excellent for this purpose and will probably have a lot of other uses in lutherie. Because of the double clamping surface there is a lot of flexibility in how you can use them. They basically have four contact points available. The grip pads are wider than the clamp which means you can lay them flat and use the almost like a traditional bar clamp only with twice as many contact points. I hadn't considered it before, but you could probably use these to join backs and tops with them laying on their sides on top of the plates.The pads are hard enough to provide a sturdy clamping surface, but soft enough to 'grab' on the curved sides without sliding down the curves. I currently have four of them. Two 12" and two 18". They aren't cheap, but I'll probably pick up a few more of these at some point.
Here is what they look like.
I'm not at the shop today, but will be a bit later. I'll try to get some pictures.
My poorly maintained "Blog"
-
Jim_H
- Posts: 506
- Joined: Tue Sep 06, 2011 2:51 pm
- Location: Bothell, WA USA
Re: Crazy Cocobolo!
Here are some more pictures. I finally broke out the newer camera (that can focus up close)


Also, since this has turned into a build thread instead of me ranting about the wackiness of cocobolo, the mods may want to move it to a more appropriate place.
Also, since this has turned into a build thread instead of me ranting about the wackiness of cocobolo, the mods may want to move it to a more appropriate place.
My poorly maintained "Blog"
-
Kevin Sjostrand
- Posts: 3719
- Joined: Sat Feb 09, 2008 8:06 pm
- Location: Visalia, CA
Re: Crazy Cocobolo!
Oh Jim, this is turning out nice. That is a special top too.
Great job. I love cocobolo.
Kevin
Great job. I love cocobolo.
Kevin
-
johnnparchem
- Posts: 2354
- Joined: Sat Apr 10, 2010 10:50 pm
- Location: Seattle
- Contact:
Re: Crazy Cocobolo!
Jim I agree your guitar is turning out very nice. Thanks for the detailed description of your process for dealing with the bindings on this guitar. The rosette work still looks clean even with the in focus picture. Did you shellac the inside back. It looks really shiny through the sound hole.
-
Jim_H
- Posts: 506
- Joined: Tue Sep 06, 2011 2:51 pm
- Location: Bothell, WA USA
Re: Crazy Cocobolo!
I wiped two very light spit coats of shellac over the mahogany center strip before I glued it in. I did the same to the braces after they were glued.
The rest is just wiped down with a soft cloth dampened with a very light shellac/alcohol mixture. I glued the back to the rim first (not sure I'll do it this way again), so I had easy access to the back before I mounted the top. I was careful not to get any shellac anywhere that might compromise a glue joint.
Looking at these pictures, I think I should have used a simple black/maple purfling between the binding and the top instead of the herringbone, or at least put a .010 maple purfling between the binding and the herringbone. Not enough contrast there.
That was the last of my herringbone, and I don't think I'll be buying any more.
Re: the rosette, those channels were *tight*. Probably too tight. I used a 1/16" bit for the b/w/b and I had to carefully widen the channel using a tiny chisel. I had to cut that cocobolo circle three times before I got it just right. Again, the tolerances were super tight.
In fact, I meant to give John Hall some kudos for recommending the Duco. I don't believe I could have made this work with water based glues. The Duco was great, although the open time is very short.. kinda surprised me.. Fortunately, I had everything dry fit and it went together nicely.
My poorly maintained "Blog"
-
Jim_H
- Posts: 506
- Joined: Tue Sep 06, 2011 2:51 pm
- Location: Bothell, WA USA
Re: Crazy Cocobolo!
Shaping the fretboard.
I am using a template that I made from an existing fretboard that I bought from John Watkins before he shut down his business. It's a CNC'd fretboard that is the spec I wanted for this guitar (1.75" nut 2.19" string spacing, 25.4" scale). It had some cosmetic issues and was pretty ugly, so I decided to use it as a template.
I drilled holes in this and placed drill bushings for the locating holes (I actually just epoxied in 1/8" wheel collars from the hobby store). I use one side to drill the fretboard locating pins, then flip it over and use the other side to drill the neck locating pins.
The ebony fretboard is from LMI. I bought it with the fret slots cut for 25.4" scale, and radiused to 16", but not tapered, so I can cut them to whatever neck shape I want. I use the center line as a reference and tape the fretboard to the template guide using double sided tape. I then use the bandsaw to cut very close (within 1/16" of an inch), and then use the router table with the pattern bit to trim it to final shape using the template.
I forgot to take pictures until after I finished the last step.
You do not have the required permissions to view the files attached to this post.
My poorly maintained "Blog"