Page 1 of 2
How do you cut binding channels
Posted: Wed Aug 12, 2015 1:37 pm
by geoawelch
Have contacted forum members and manufacturers but thought this might be of interest to others
I'm working on guitar no. 5, this one an OM from KMG
An Achilles heel has always been cutting the binding channels, especially on the back. I haven't used a method yet that I feel completely comfortable with. I'm debating making the investment into a standalone system
The previous guitars I have cut the channels as demonstrated by Stew Mac in their instructions- using a 5 degree wedge for the back (first guitar). The next three used the KMG 1A Binding Attachment mounted to a Bosch Scout trim router
So, I guess what I'm looking for is:
- what method do you use
- what methods did you try and discard
At this time I'm contemplating the KMG Table Mounted System and The Universal Binding Machine that John Hall sells. Thanks for your time and advice.
George
Dunbarton, NH
Re: How do you cut binding channels
Posted: Wed Aug 12, 2015 7:57 pm
by tippie53
https://www.youtube.com/watch?v=Lan2pKWE1Do
I use a binding machine. I have tried many different ways to do this from hand held units , routers and this is way I have been doing it for the last 8 yrs or so. I find that having a carriage for the body allows minute tweaking if needed. The more complex the scheme the more you have to control the variables.
Re: How do you cut binding channels
Posted: Wed Aug 12, 2015 9:07 pm
by geoawelch
John
Thank you for your comment as well as your email correspondence
One of the decisions I need to make is what is most economically feasible as I am not a prolific builder
George
Re: How do you cut binding channels
Posted: Wed Aug 12, 2015 10:00 pm
by ruby@magpage.com
George
I, too, have the KMG router base jig, and after 5 guitars I have no intention of changing. Everything has worked out just fine so far with this tool. If I planned on making another 50 guitars I would change, but for a few more, all's well.
Ed
Re: How do you cut binding channels
Posted: Wed Aug 12, 2015 10:37 pm
by Ben-Had
I use a tower with the base from a KMG IA I modified for it.
Re: How do you cut binding channels
Posted: Thu Aug 13, 2015 12:20 am
by Benjy
Me being the tight wade that I am and I like making stuff so I made my own router stand and "sled" to put the body on.
I make sure that the router is level and the sides are perfectly square to the router. here are some pictures of my set up.
Re: How do you cut binding channels
Posted: Thu Aug 13, 2015 8:17 am
by geoawelch
I appreciate all of the replies and comments - thank you.
Does anyone here have direct experience with KMG's table mounted system-
“Guitar Binding Channel Routing System” © v2
plus top and back overhang trimmer
Would appreciate the input
George
Dunbarton NH
Re: How do you cut binding channels
Posted: Thu Aug 13, 2015 11:52 am
by tippie53
I suggest you call him and ask him.
Re: How do you cut binding channels
Posted: Thu Aug 13, 2015 11:59 am
by geoawelch
Hi John
Thanks for the suggestion
I communicate with Ken regularly and have quite a few of his lutherie tools
They and the material in my kit are first rate
I was hoping to get input from someone who has used it but is not the maker
George
Re: How do you cut binding channels
Posted: Fri Aug 14, 2015 5:30 pm
by rcnewcomb
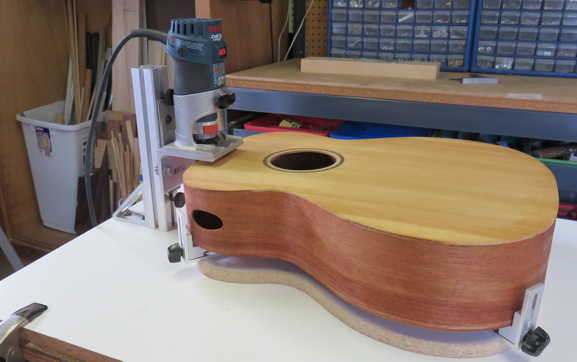
Here's the setup that I used along with Kathy Matsushita's write-up:
The soundbox is set in the body carriage, which has four adjustable body support blocks. You adjust the blocks first so they hold the body securely in the carriage, and then you adjust the blocks up and down, so that the sides are perpendicular to the table at all points. This adjustment is necessary, because the soundbox has a taper from the tail end to the neck end. If you just let the router rest flat on the top or back surface, the router bit will cut at an angle at the tapered areas of the body (the major taper being at the neck end). The router is perpendicular to the table, so this jig allows you to rout the binding channels (or cut the overhang flush, in this case) perfectly parallel to the sides.
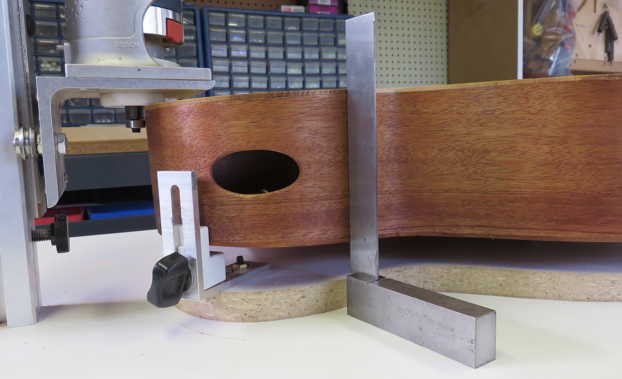
To adjust the blocks so the sides are perpendicular to the table, you just use a square to check the angle of the sides.
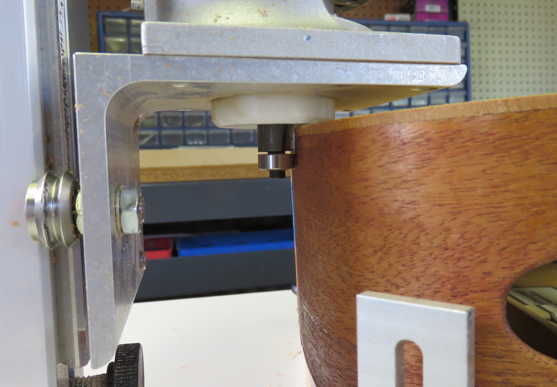
This is how the router rests on the body. Here the router has been fitted with a flush-cut bit with a bearing. The bearing follows the side, as the router moves up and down following the rise and fall of the body. At all times, the router itself is perpendicular to the table and parallel to the side.
To use the jig, you turn on the router, set the white "donut" partially on the edge of the top or back, move the body to the bearing, and, holding the body in the carriage, rotate the body as the bearing follows the sides.